The Last Piece
The last thing we need to do to complete the mobile application is create the service that reaches out to the external API. We want to develop this in a reusable manner so all future applications we create can leverage this as well. To start we will first have to create a mBaaS service and then associate it to the project.
Creating a services
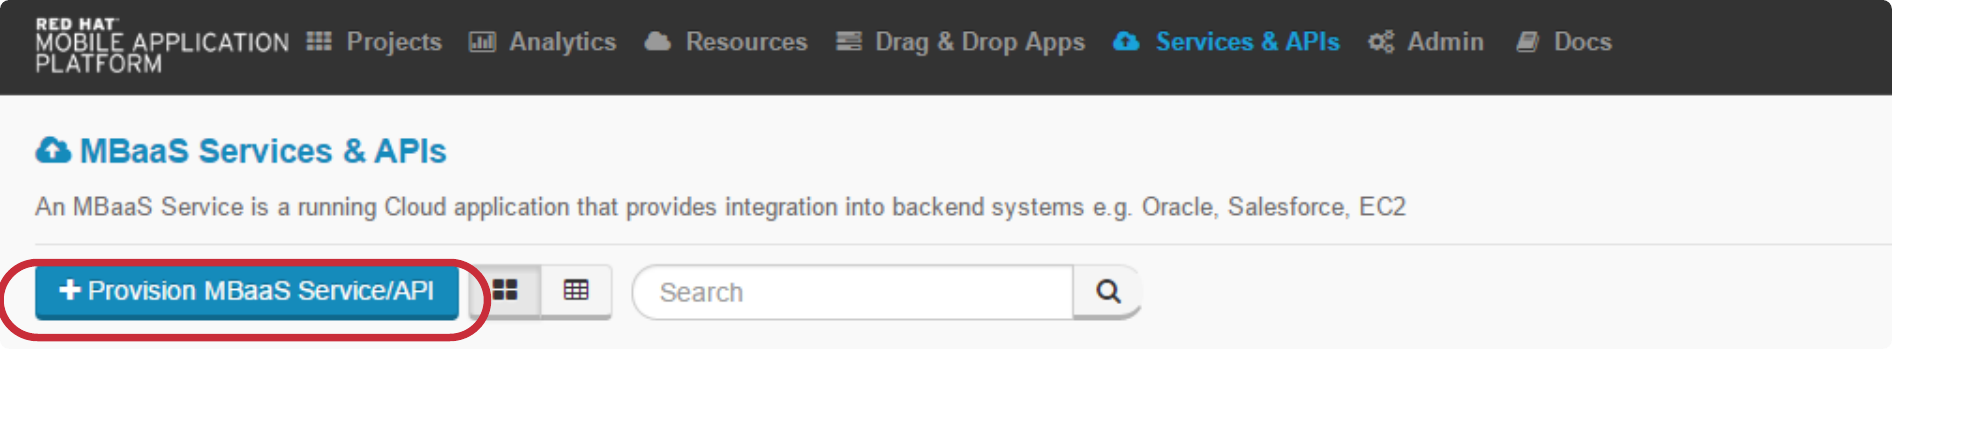
Select Services & API's in the studio header.

This page will list all preexisting mBaaS APIs and allow you to create/modify more.
Select Provision MBaaS Service/API.
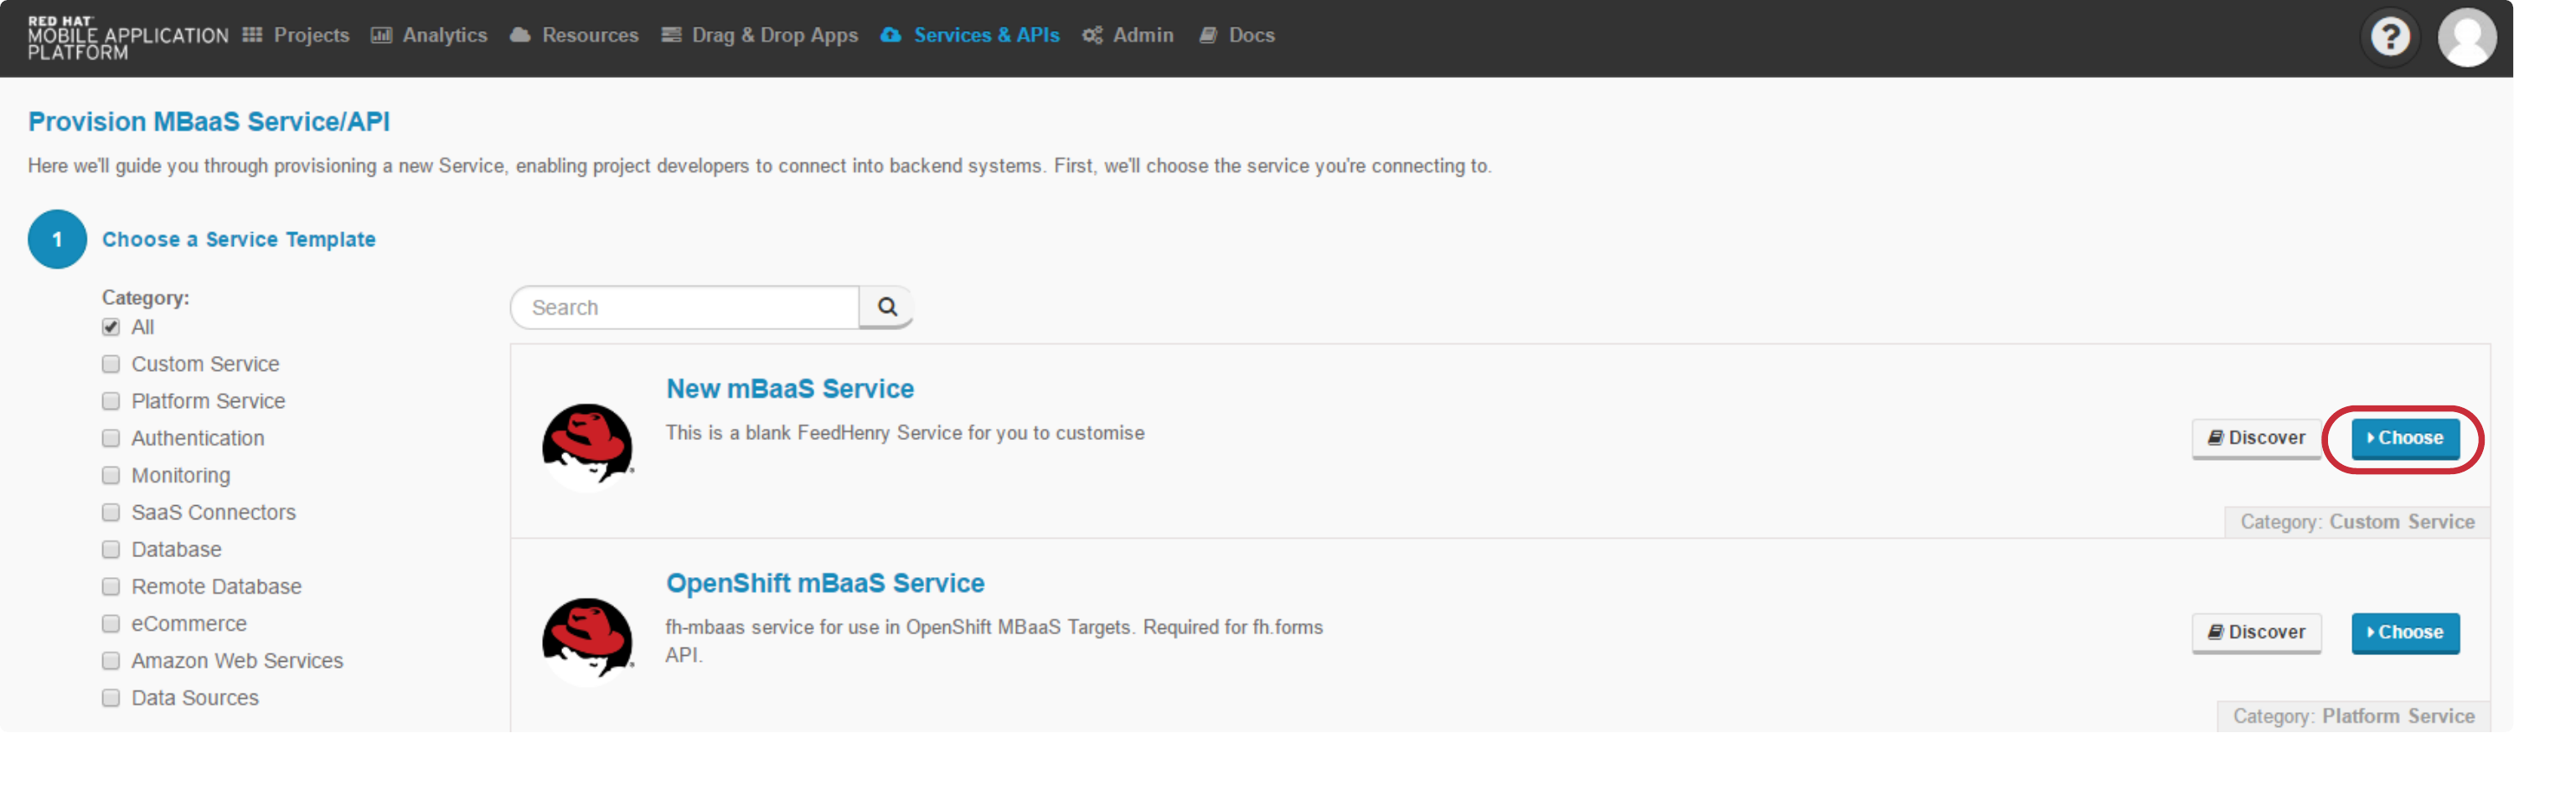
The following page will list all preexisting services templates that Red Hat provides. Many common services such as Salesforce, MongoDB and MySQL connectors are there to making connecting to your existing infrastructure easier. If a service doesn’t exist within Red Hat’s templates we can create a new one like we will in the lab.
Click Choose inside the New mBaaS Service section.
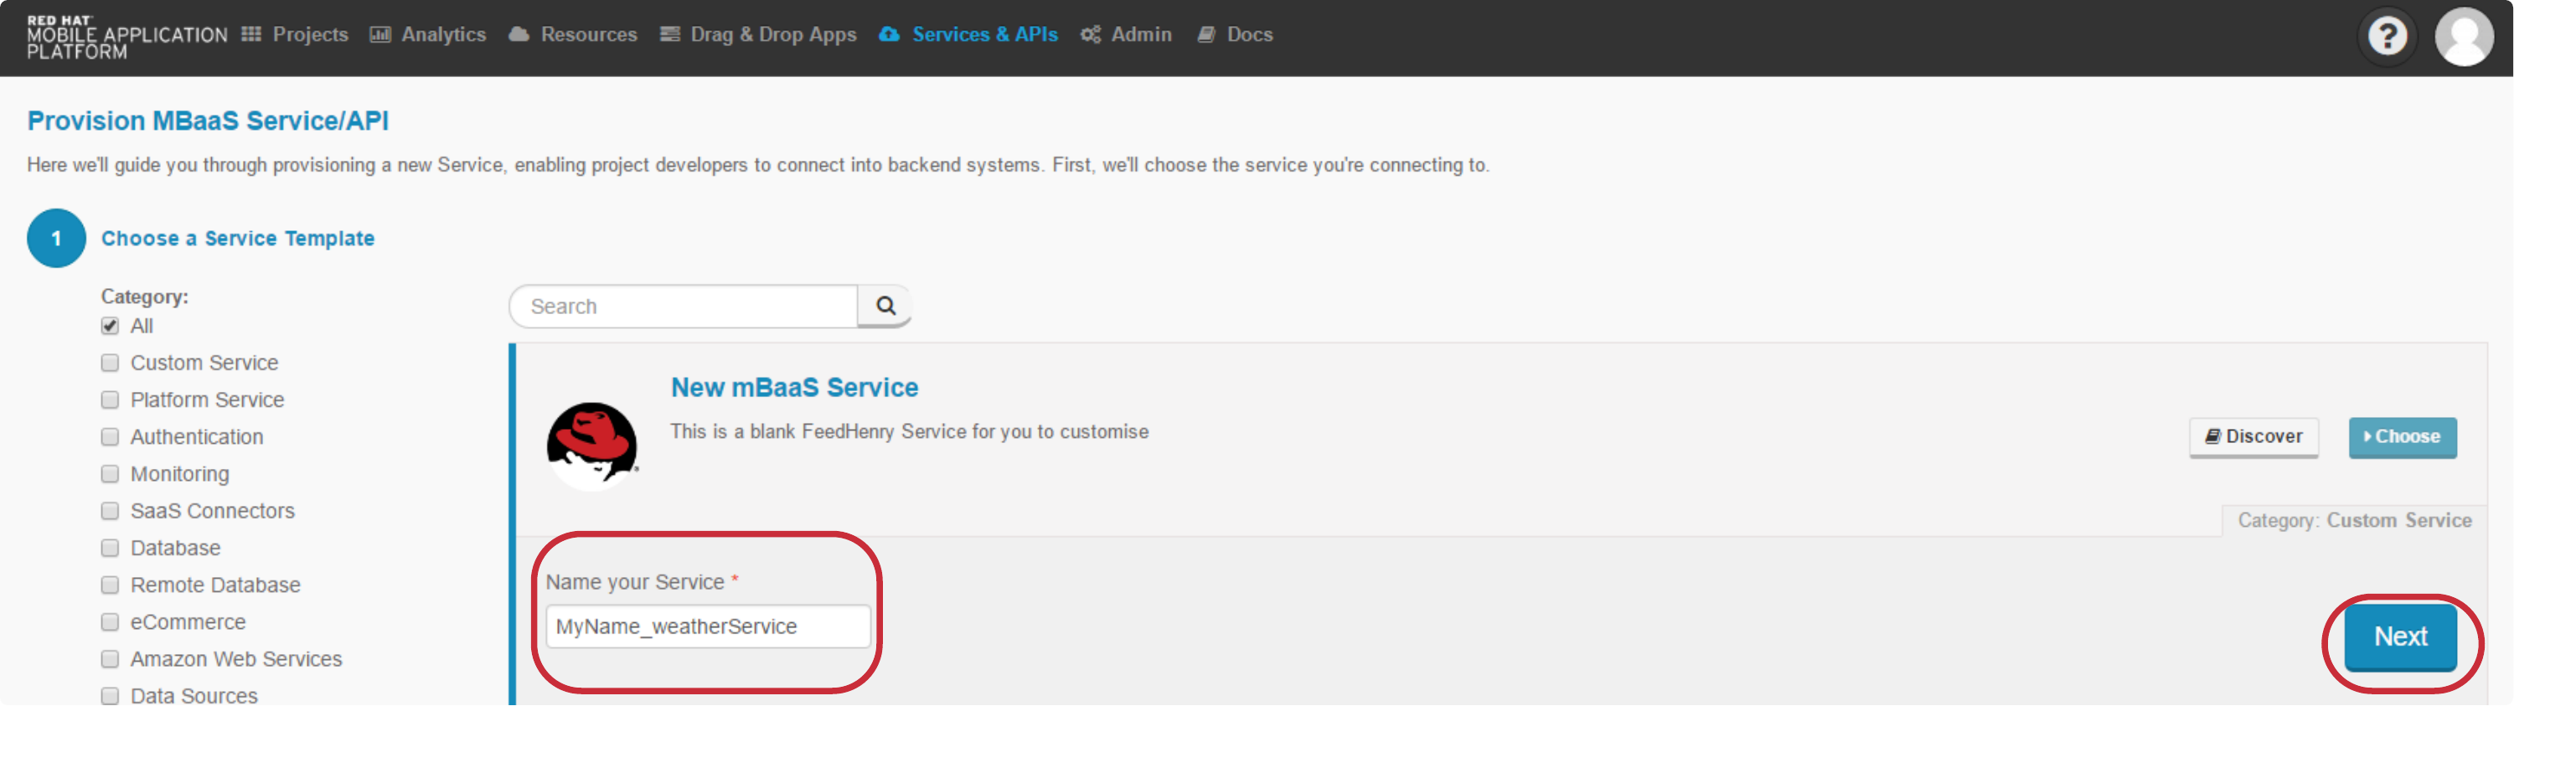
Name your service '\<yourname\>\_weatherService' and click Next to proceed.
Once the bar turns green, click Finish to continue to the service Details.
4.
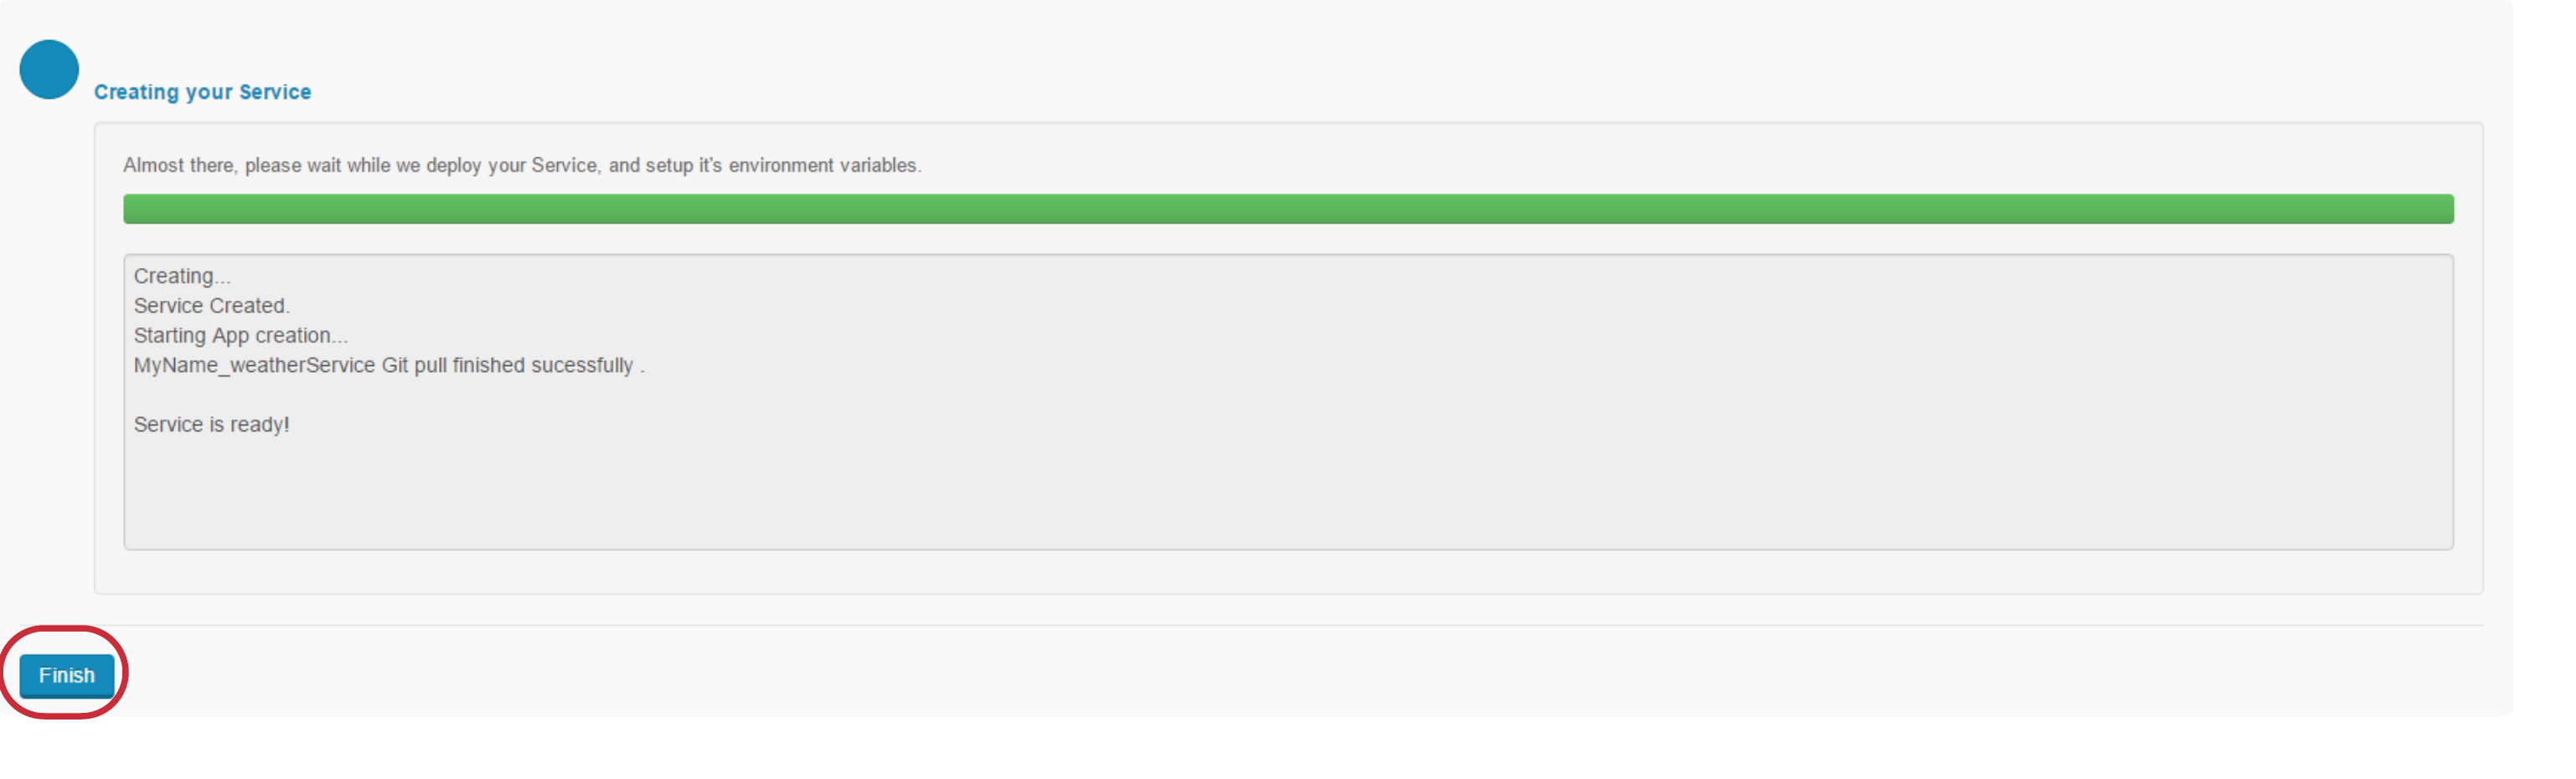
Once that is finished you created the framework for a mBaaS service. This creates this git repository and all necessary networking functionality.
Sharing Access to the mBaaS Service.
Now that we have created the mBaaS service we need to add the service to our project. We can also add that functionality to the whole platform, allowing any team to use the endpoint.
The last step should have navigated you to the details page of the service you created. If you are not there, navigate to the Details page.
In the Access Control settings, tick "Make this Service Public to all Projects and Services" and type your project name into the project field.
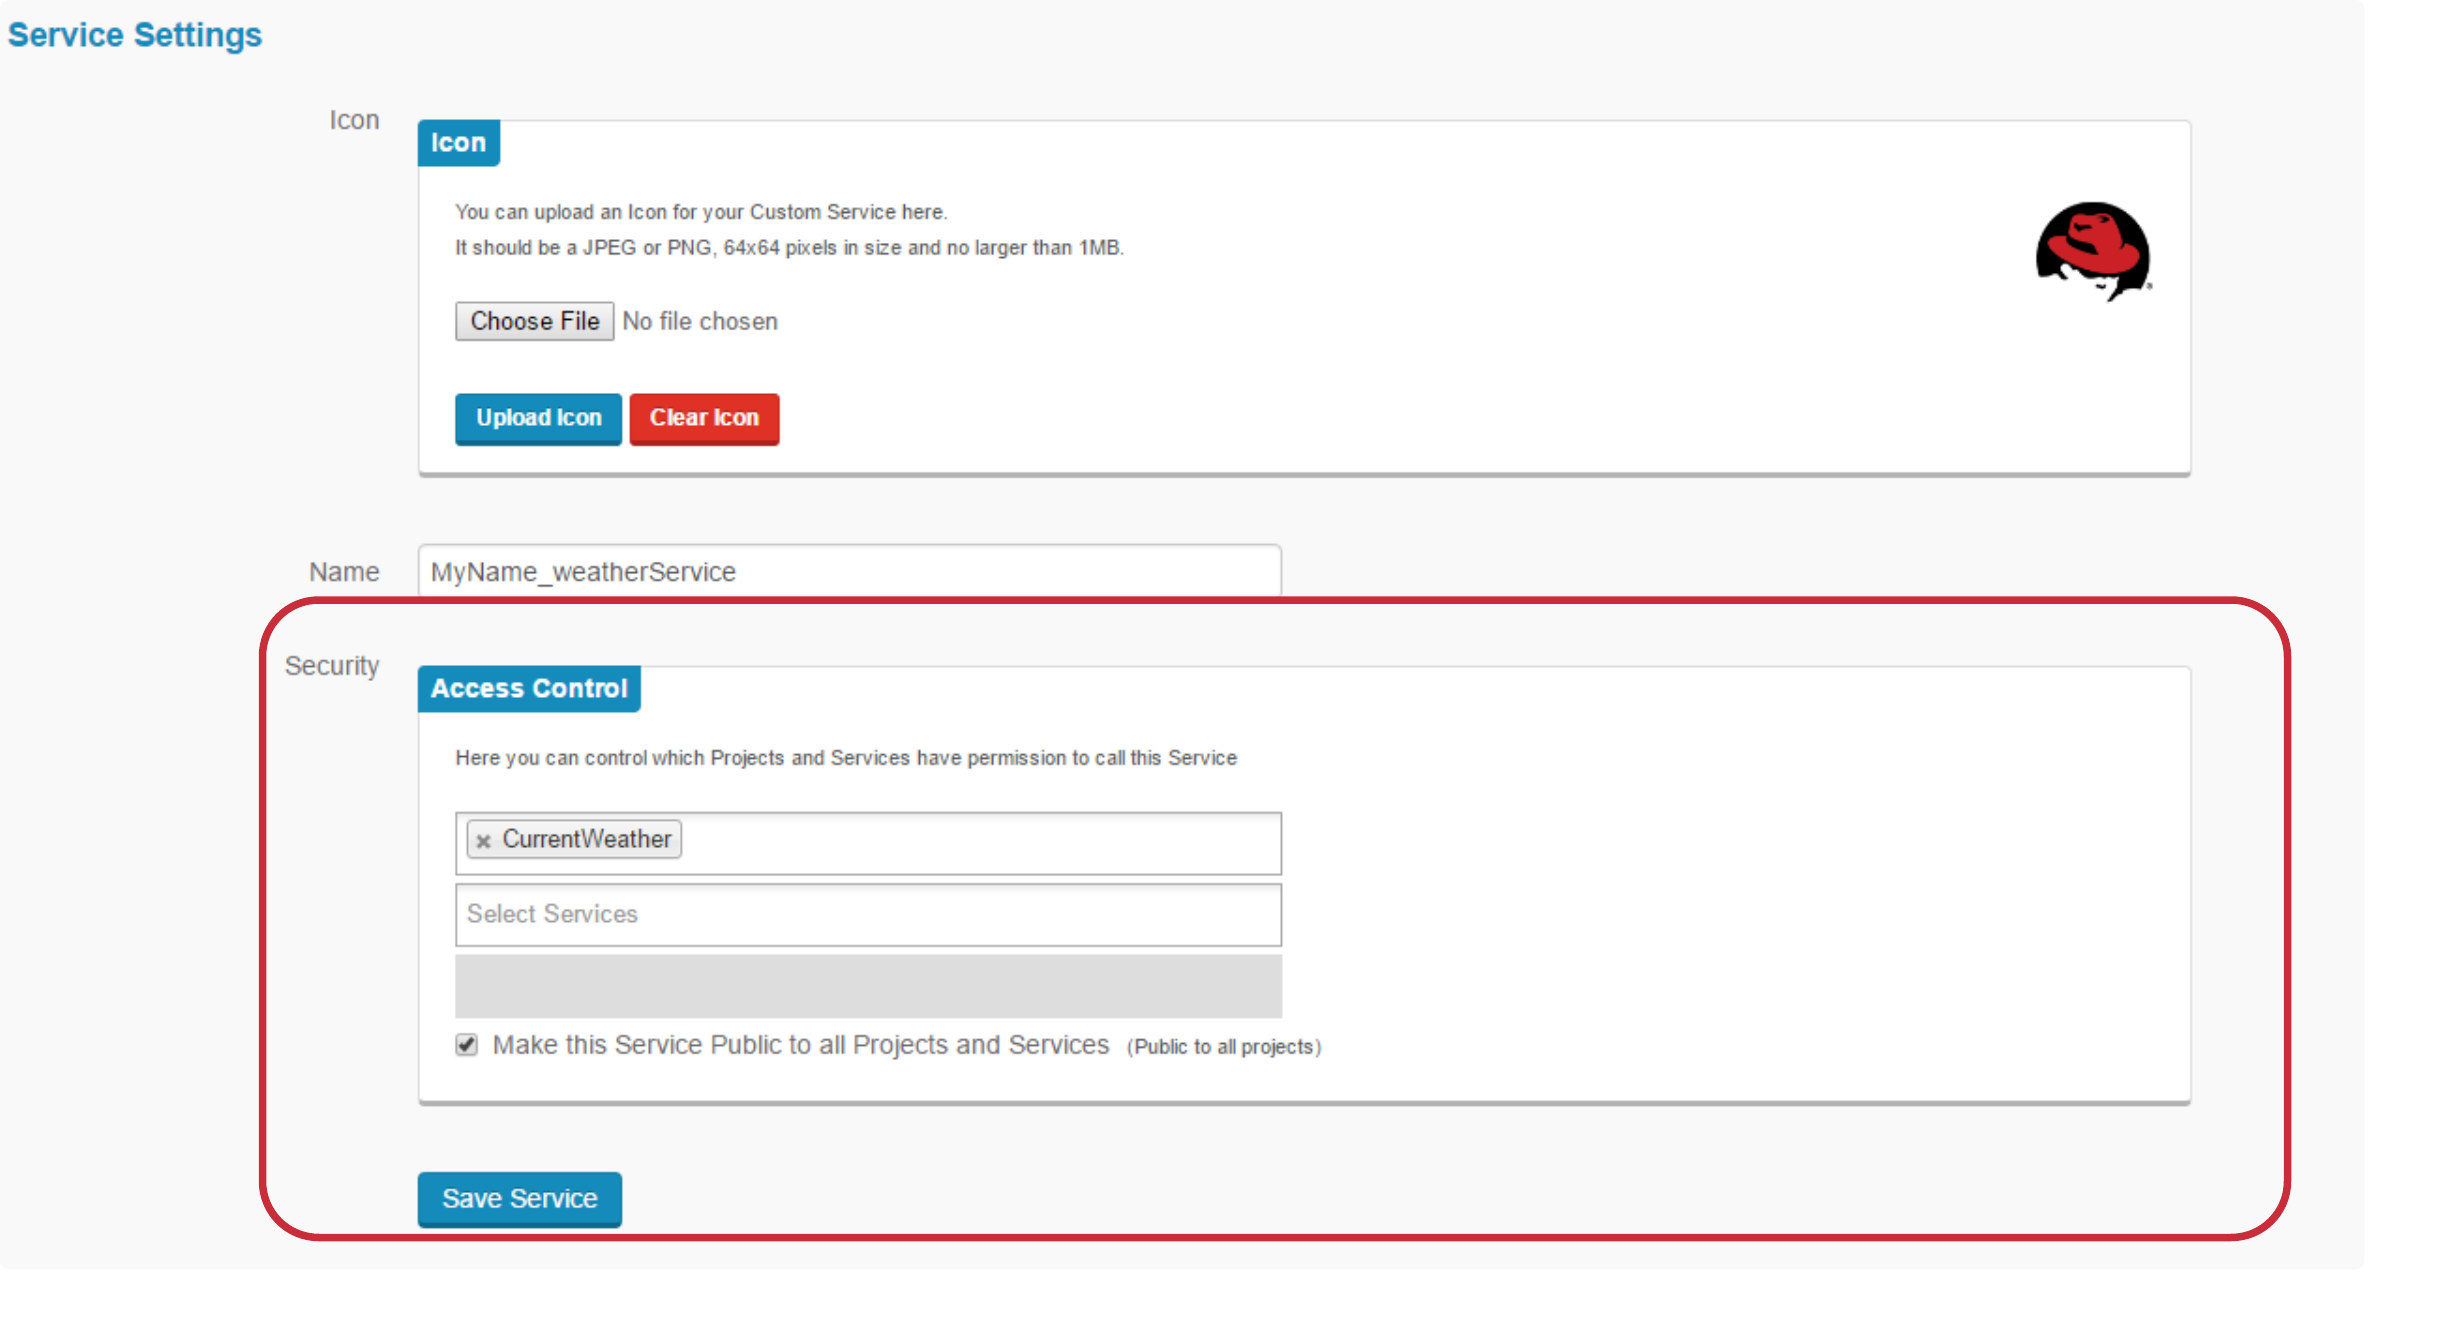
Select Save Services and click Confirm.
This will take you on to the next section of the lab where we will deploy our service.
Redploying and Cleaning the Stage
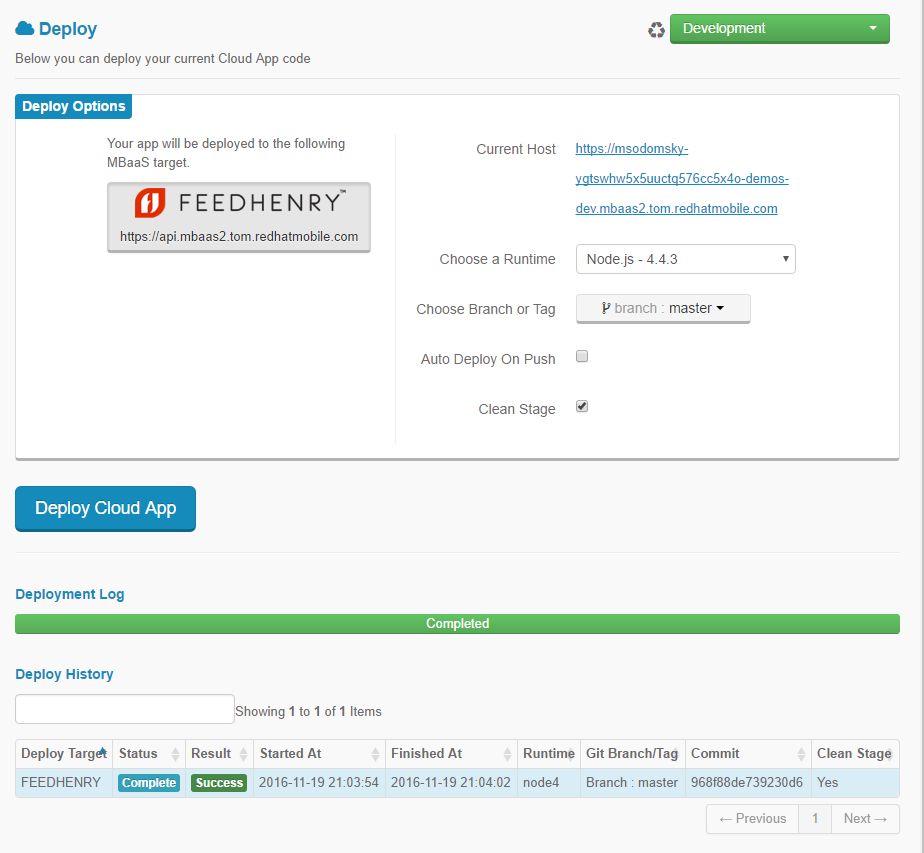
Tick Clean Stage. This will clear your node.js project and send any new configurations to it.
Select your Node.JS runtime. Any of the runtimes today will work for this lab, but we recommend the newest version of 4.X.X.
You can now select the environment which you would like to deploy this service to. Since we are still developing this mBaaS service, lets deploy this to Development. This is the default.
Select the Deploy Cloud App button.
Exploring the endpoint
Endpoints are used to connect different services and apps together. The blank mBaaS template we used to create this service has all the pieces to get you started and comes with a prebuilt endpoint already.
Click the URL after Current Host. You will see the message “Your Node.js code is deployed and running. This file is served statically from public/index.html.” If you do not see this your service may not have completed deploying.
By adding ‘/hello’ to the end of the url in your browser you can see your endpoint. You should see the message “{“msg”:”Hello World”}”.
Lets develop this locally!
Lets modify this code locally as its easier in an editor you are used too. Since RHMAP stores all its code in git we can use all git commands and we aren’t locked into using FHC to clone any code.
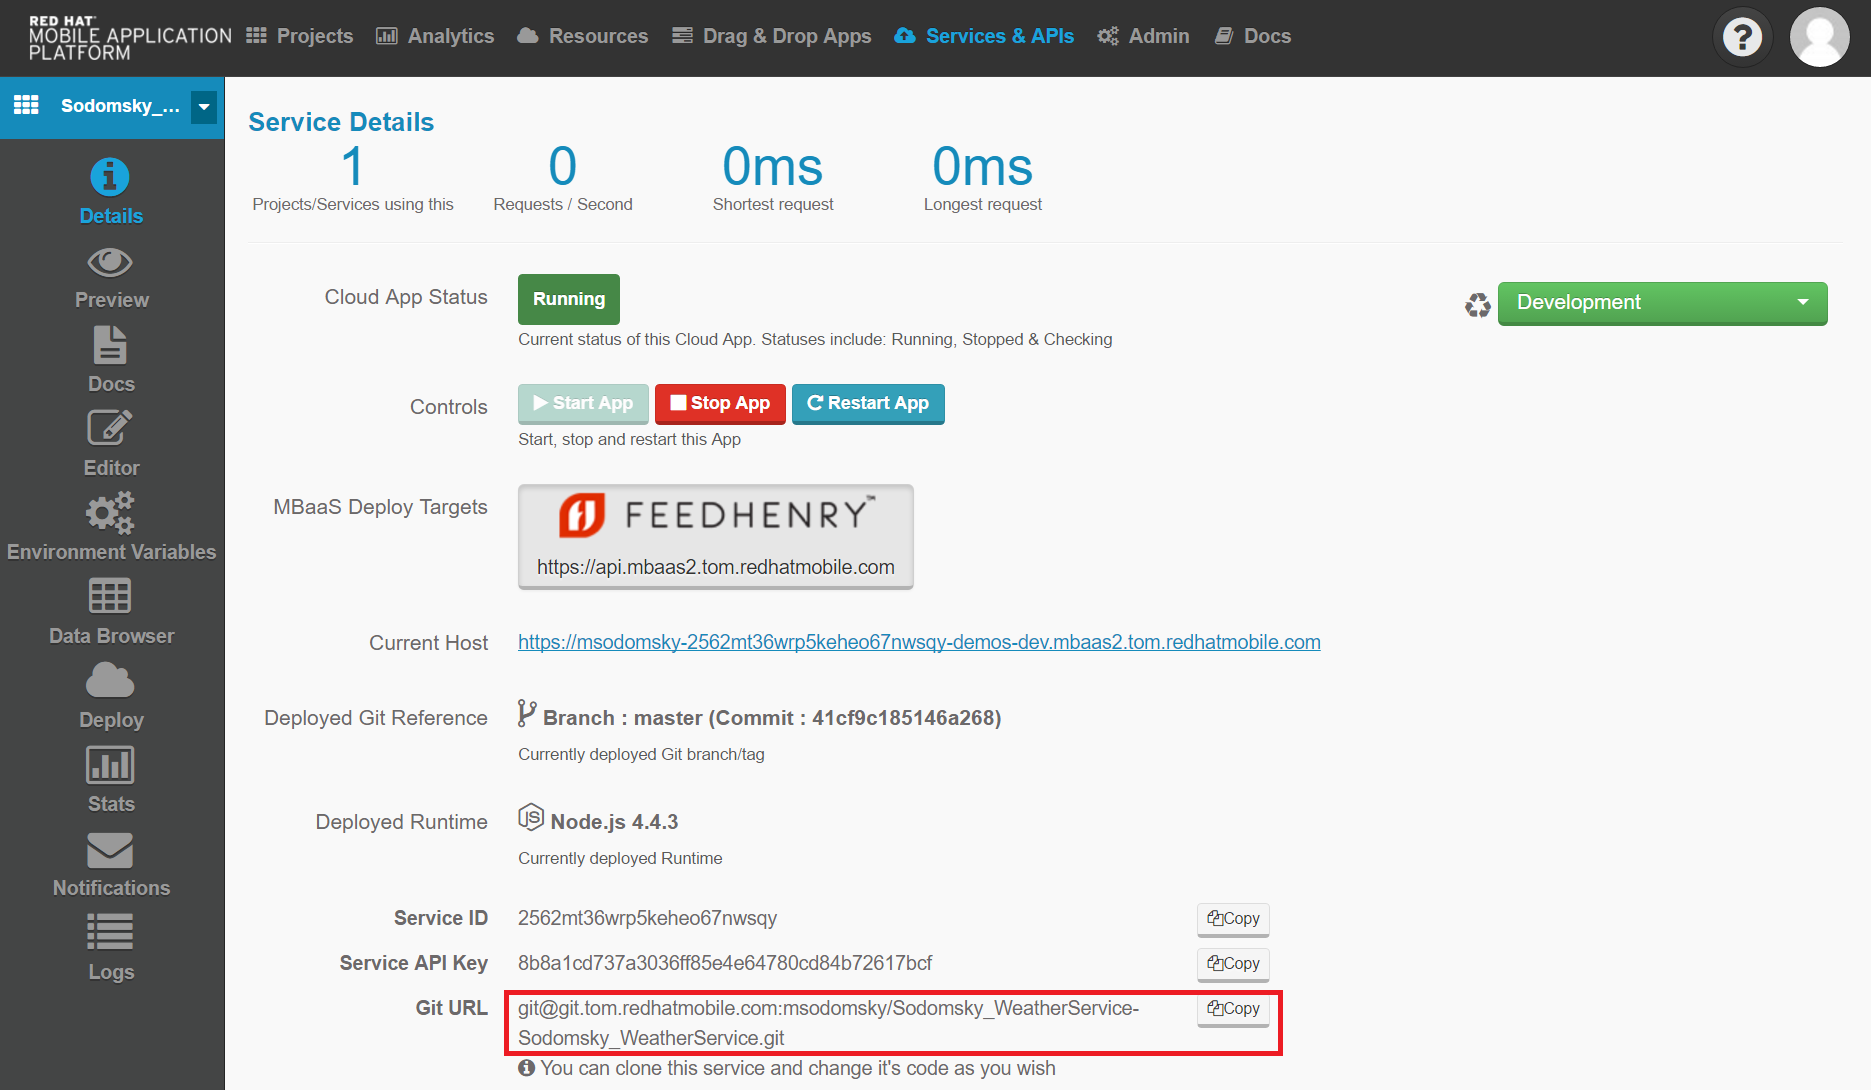
We will need the git URL that is associated to our mBaaS Service. Navigate to the Details page to copy that link.
To start lets navigate our terminal back to the folder where we cloned everything. Once we are there we will clone the mBaaS service.
Goto the terminal and type the following (replacing the git url with yours):
$ cd ~/workspace/rhmap/
$ git clone <git url>
$ cd <new service directory>
Adding a New Endpoint
In this lab we will be creating a new endpoint to query a weather API. We will need to modify the application.js file and create a new endpoint file. We will start by modifying the application.js file
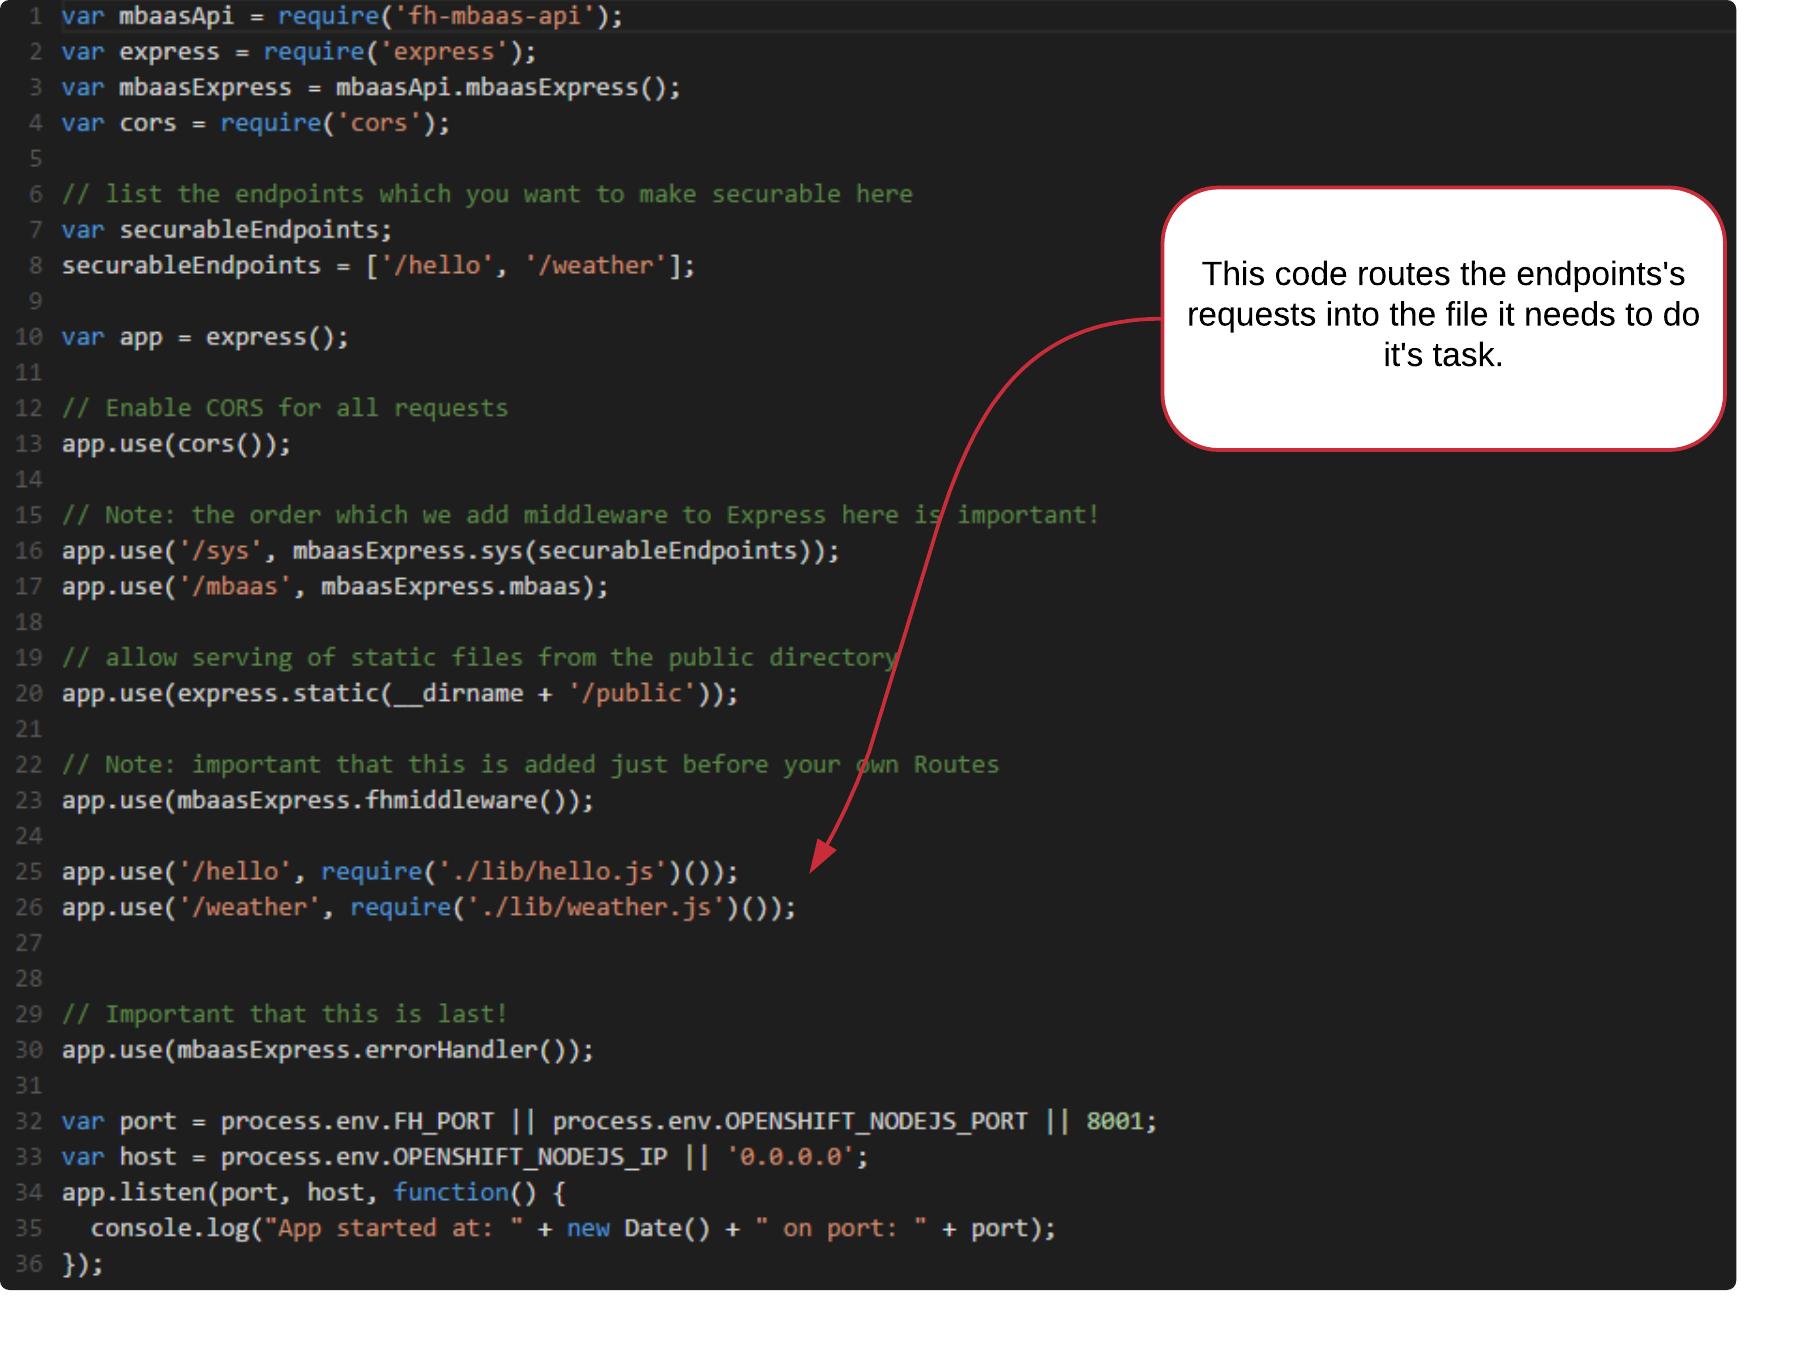
Open the application.js file in any editor you are comfortable in. We will overwrite this file and then step through what code is doing in the file.
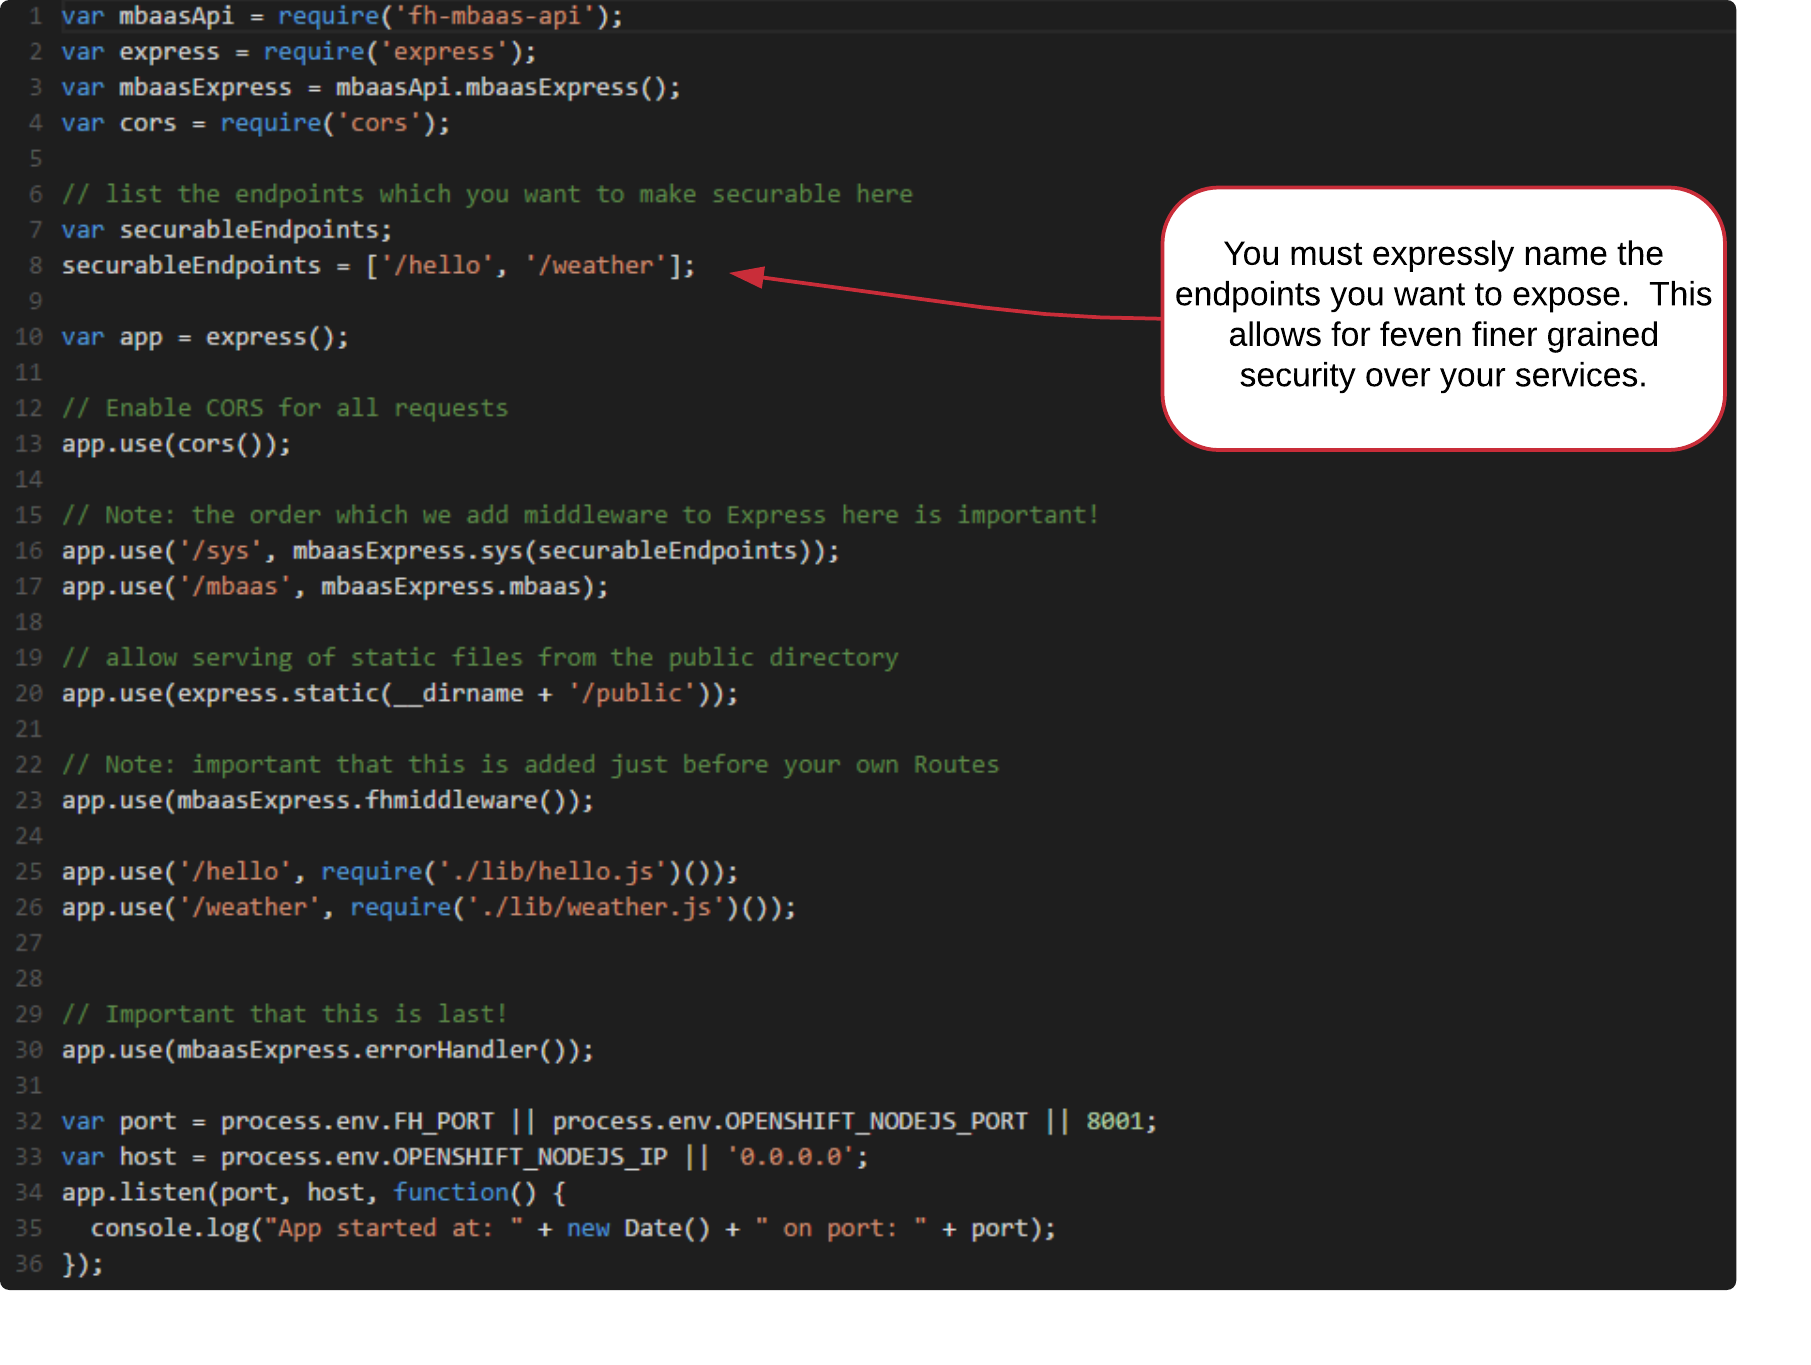
Overwrite application.js with the following contents:
var mbaasApi = require('fh-mbaas-api');
var express = require('express');
var mbaasExpress = mbaasApi.mbaasExpress();
var cors = require('cors');

// list the endpoints which you want to make securable here
var securableEndpoints;
securableEndpoints = ['/hello', '/weather'];

var app = express();

// Enable CORS for all requests
app.use(cors());

// Note: the order which we add middleware to Express here is important!
app.use('/sys', mbaasExpress.sys(securableEndpoints));
app.use('/mbaas', mbaasExpress.mbaas);

// allow serving of static files from the public directory
app.use(express.static(__dirname + '/public'));

// Note: important that this is added just before your own Routes
app.use(mbaasExpress.fhmiddleware());

app.use('/hello', require('./lib/hello.js')());
app.use('/weather', require('./lib/weather.js')());


// Important that this is last!
app.use(mbaasExpress.errorHandler());

var port = process.env.FH_PORT || process.env.OPENSHIFT_NODEJS_PORT || 8001;
var host = process.env.OPENSHIFT_NODEJS_IP || '0.0.0.0';
app.listen(port, host, function() {
  console.log("App started at: " + new Date() + " on port: " + port);
});
Save application.js.
Lets Modify the Weather route
We will now need to create the weather.js file in the lib directory.
Goto the terminal and type the following:
$ cd lib
$ cp hello.js weather.js
Open the weather.js file in any editor you are comfortable in.
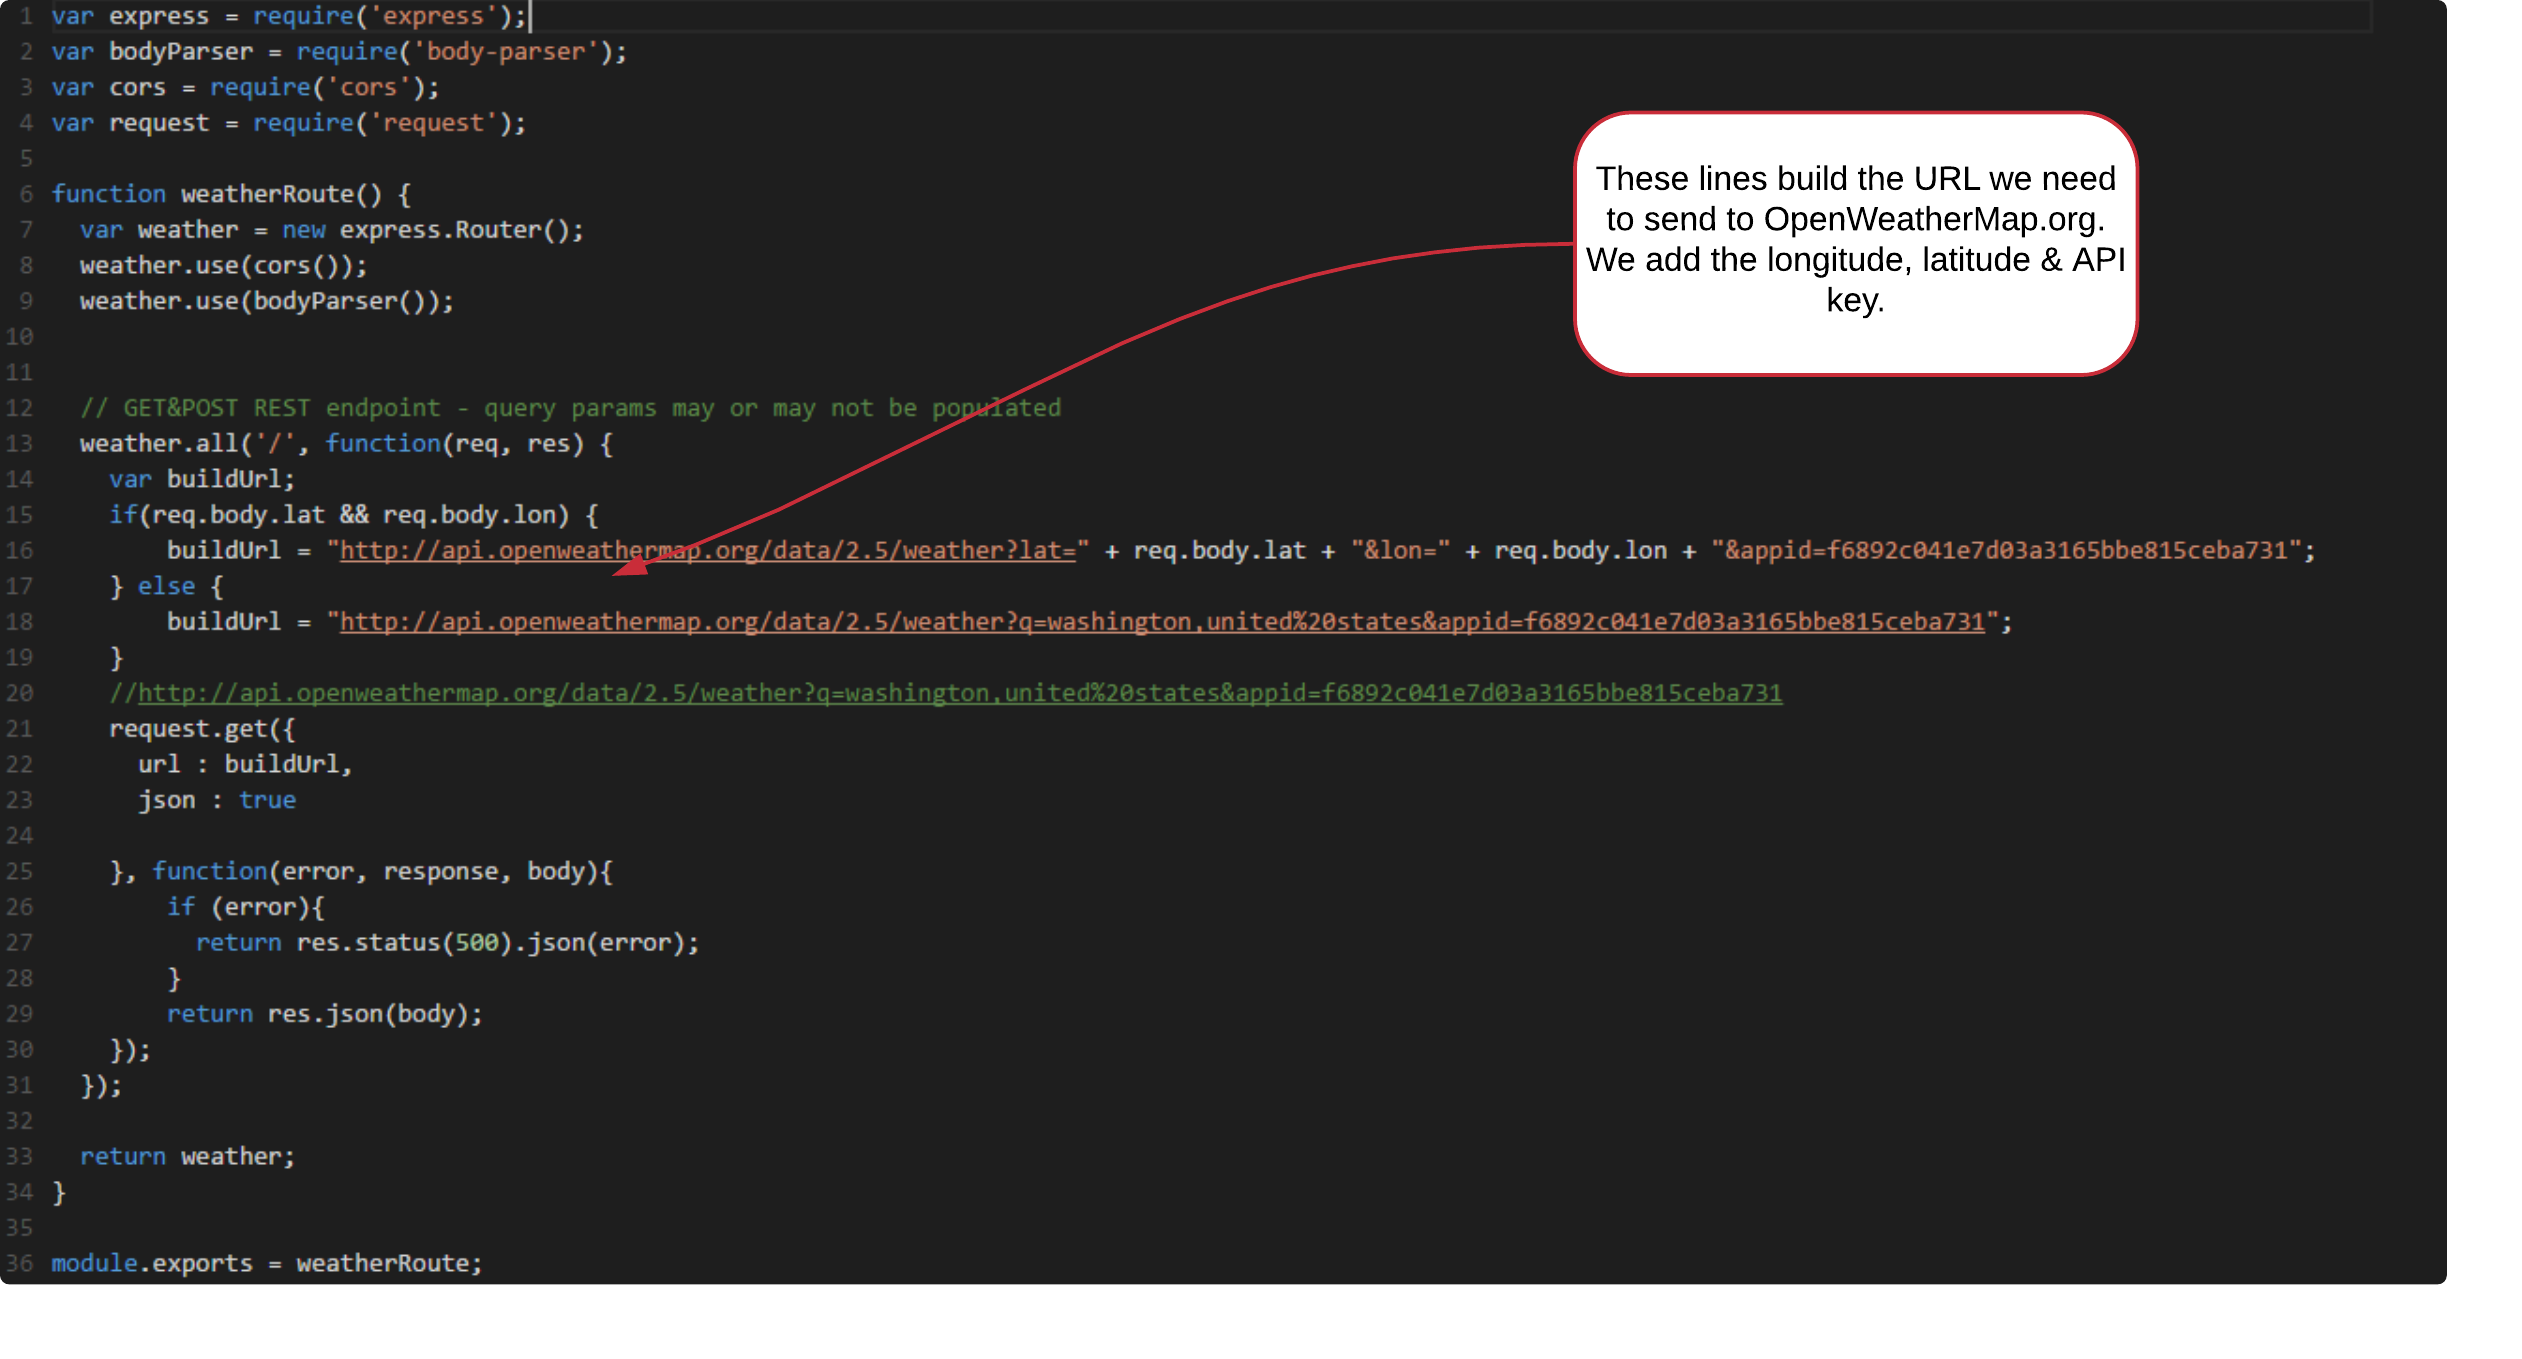
Overwrite weather.js with the following contents.
var express = require('express');
var bodyParser = require('body-parser');
var cors = require('cors');
var request = require('request');
function weatherRoute() {
var weather = new express.Router();
weather.use(cors());
weather.use(bodyParser());
// GET&POST REST endpoint - query params may or may not be populated
weather.all('/', function(req, res) {
var buildUrl;
if(req.body.lat && req.body.lon) {
buildUrl = "http://api.openweathermap.org/data/2.5/weather?lat=" + req.body.lat + "&lon=" + req.body.lon + "&appid=f6892c041e7d03a3165bbe815ceba731";
} else {
buildUrl = "http://api.openweathermap.org/data/2.5/weather?q=washington,united%20states&appid=f6892c041e7d03a3165bbe815ceba731";
}
//http://api.openweathermap.org/data/2.5/weather?q=washington,united%20states&appid=f6892c041e7d03a3165bbe815ceba731
request.get({
url : buildUrl,
json : true
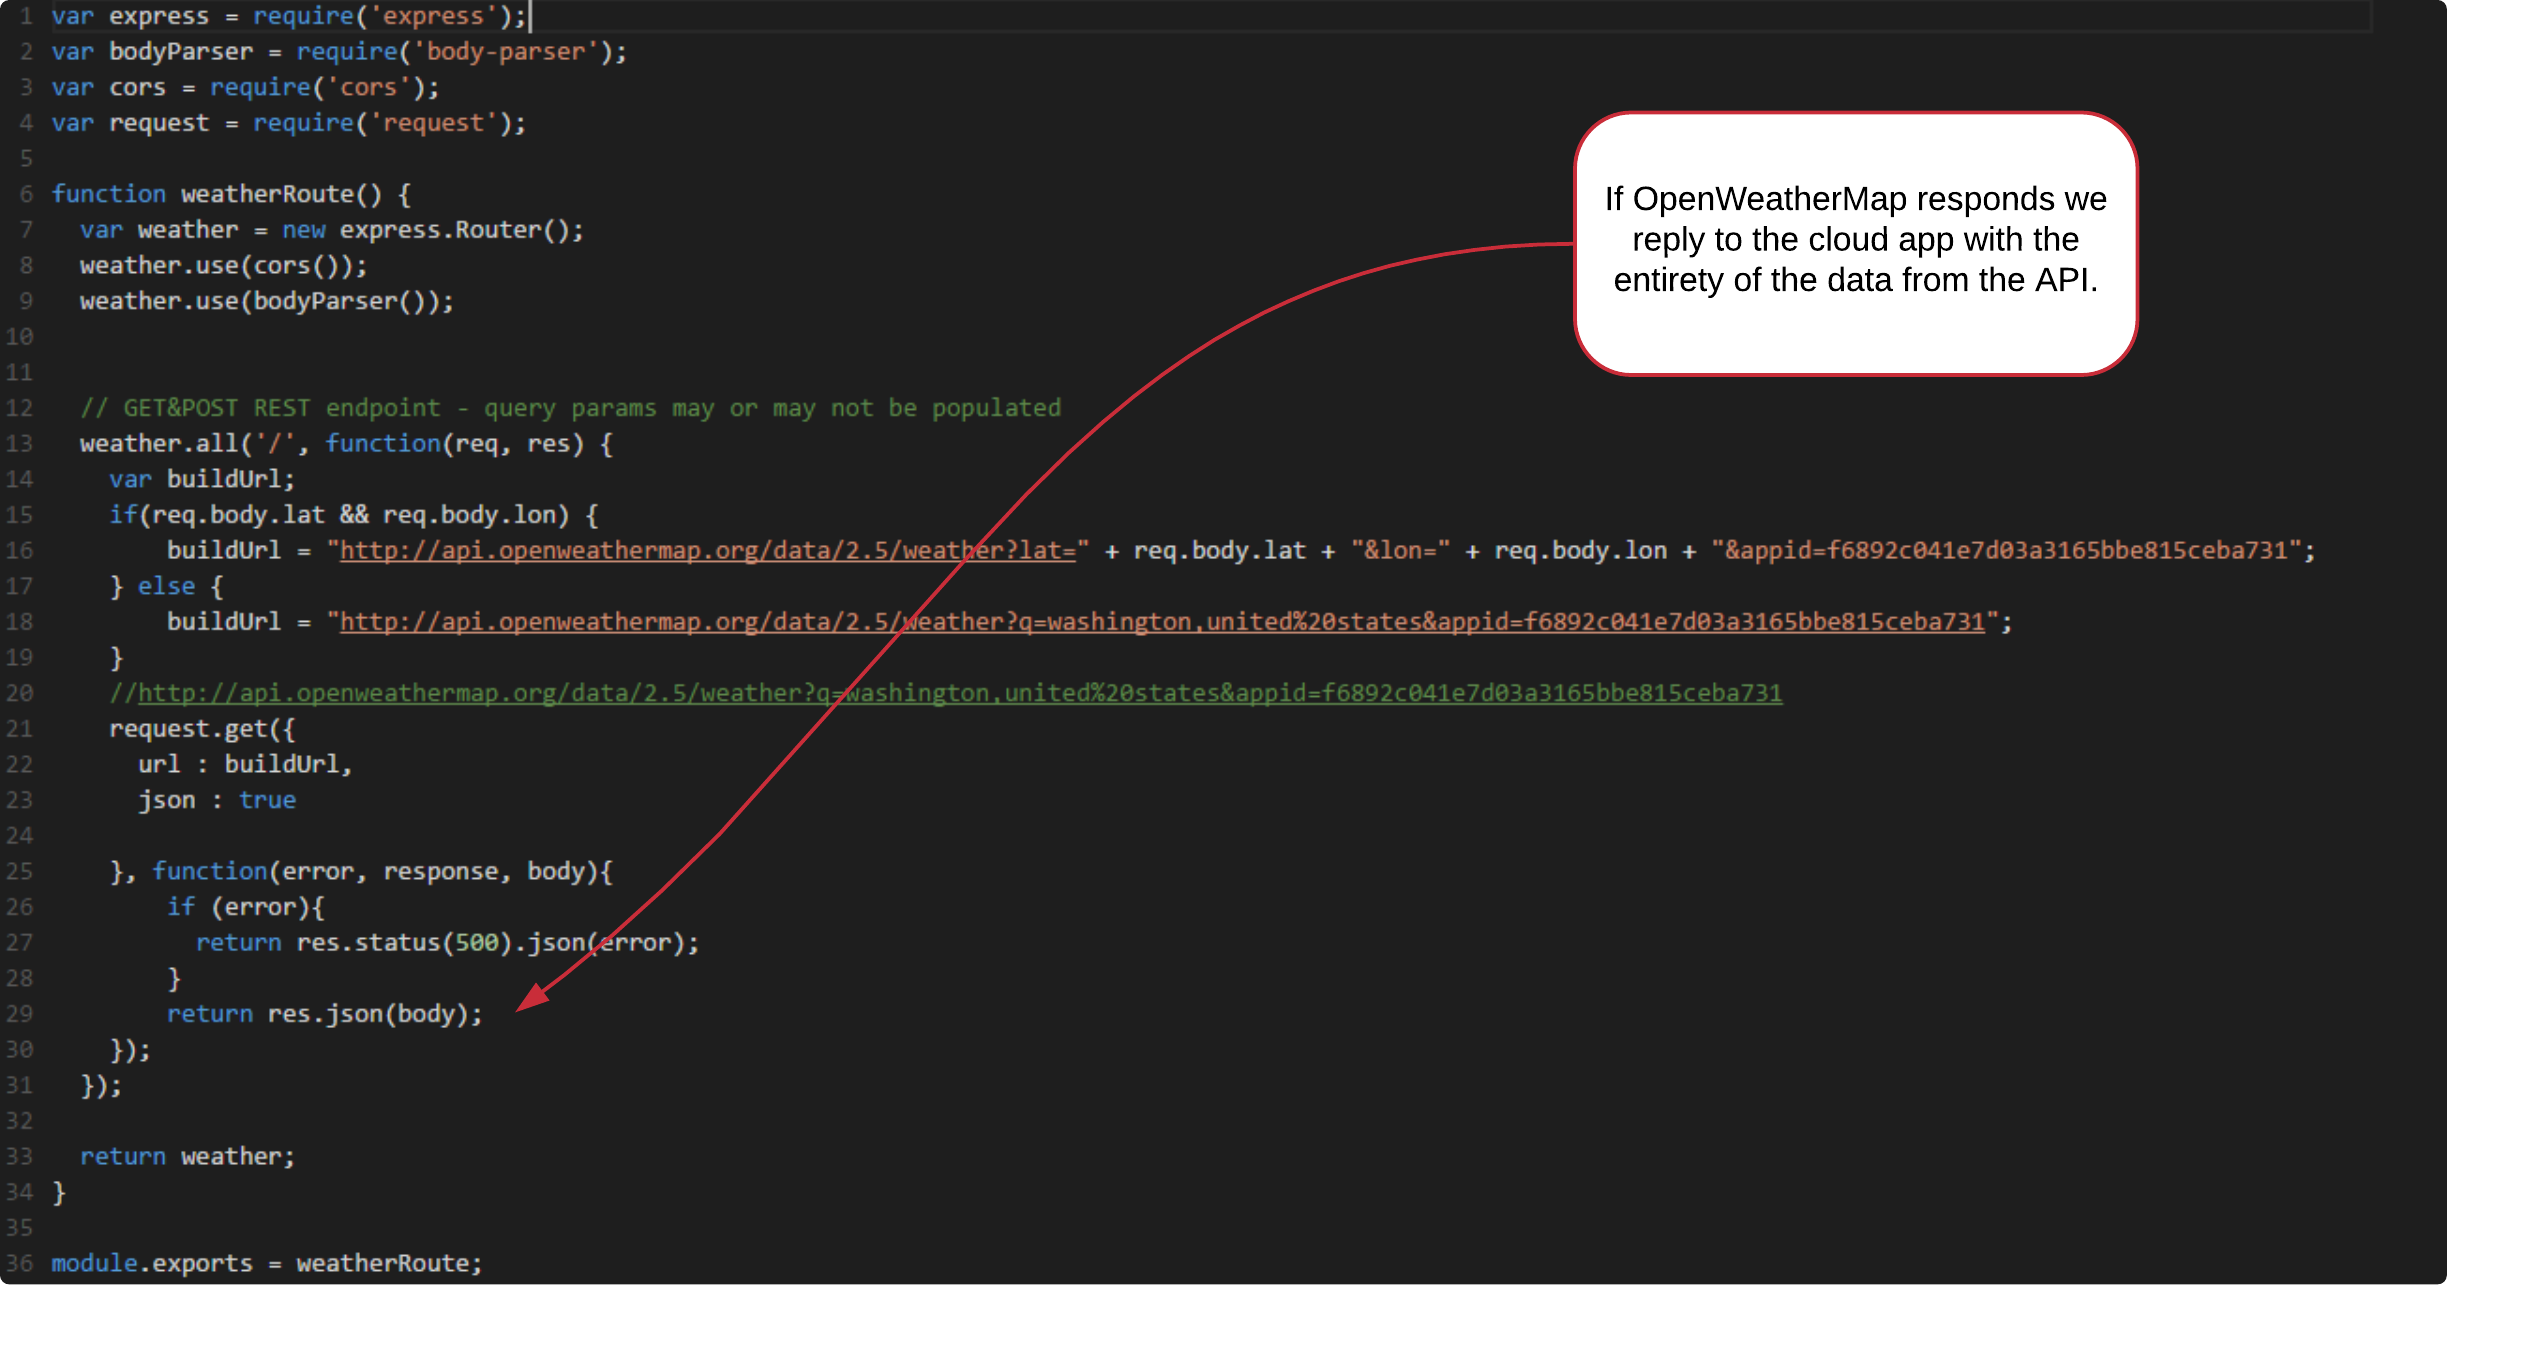
}, function(error, response, body){
if (error){
return res.status(500).json(error);
}
return res.json(body);
});
});
return weather;
}
module.exports = weatherRoute;
Pushing the code back to the platform.
Now that we developed our weather mBaaS service, we need to push it back to the platform. First we need to add the weather file to the source control.
Goto the terminal and type the following:
$ git add weather.jsOnce the weather.js file is added we will need to commit all our changes and add a comment explaining what we have changed.
Goto the terminal and type the following:
$ cd ..
$ git commit -am"Updating my mBaaS Service to connect to openweathermap API"
Finally we can push our code back to the git repository in the platform.
Goto the terminal and type the following:
$ git pushDeploying Your New mBaaS Service
Now that we pushed our code back into the platform, we need to build the code. This is done almost identically to a cloud app. We will have to navigate back to our service.
Click the Services & APIs button in the studio header.
Navigate to the mBaaS service you created. This will take you to the Details Page.
Select Deploy on the left sidebar.
Make sure Clean Stage is ticked and click Deploy Cloud App
When the progress bar turns green, your service is finishing deploying.
Click the URL next to Current Host. This will open a new browser window with the following text in it
Your Node.js code is deployed and running. This file is served statically from public/index.html.
Since we left the hello route in tact, you will be able to see if it’s working. Add ‘/hello’ to the end of the current URL in your browser and you should recieve the message:
{"msg":"Hello World"}
Now we can remove ‘/hello’ and add ‘/weather’. You will now get a query of the local weather. You can paste the results in a website like https://jsonformatter.curiousconcept.com/ to see them in a nicer format.
{
   "coord":{
      "lon":-120.5,
      "lat":47.5
   },
   "weather":[
      {
         "id":741,
         "main":"Fog",
         "description":"fog",
         "icon":"50n"
      }
   ],
   "base":"stations",
   "main":{
      "temp":279.3,
      "pressure":1006,
      "humidity":100,
      "temp_min":275.15,
      "temp_max":281.15
   },
   "visibility":402,
   "wind":{
      "speed":0.66,
      "deg":120.5
   },
   "clouds":{
      "all":90
   },
   "dt":1479688380,
   "sys":{
      "type":1,
      "id":2958,
      "message":0.0112,
      "country":"US",
      "sunrise":1479741389,
      "sunset":1479773953
   },
   "id":5815135,
   "name":"Washington",
   "cod":200
}