Exercise 7.1 - Some Background
The Linux Kernel provides many useful primitives that can be used to construct very intricate network configurations. They are very flexible and powerful. Of particular interest today are Virtual Ethernet Adapaters, Bridges, and Taps.
A Virtual Ethernet Adapater operates in the Kernel exactly the way a physical NIC would. The only difference is that instead of receiving data from a physical device, a virtual adapter recieves data from another network adapter in the stack.
A Bridge is a device that will connect multiple interfaces and allow traffic to blindly route between them. It is like a router, but with far less smarts.
Finally a Tap is very similar to a Virtual Ethernet Adapter except that it recieves data from a program in user space rather than a device in Kernel space. This means that taps can be created and managed by non-priviledged users.
Exercise 7.2 - Container Network Devices
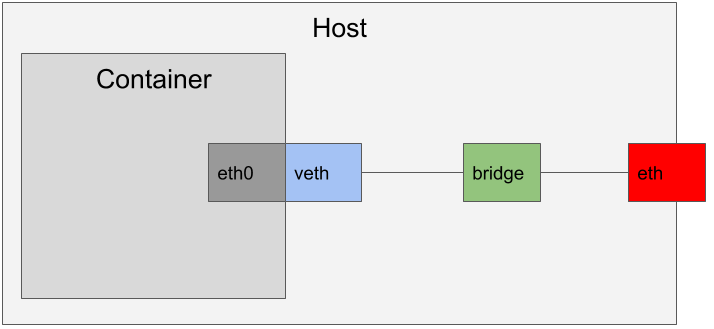
As we have already seen, when a container intiates a new Network Namespace, it wil have no network devices available to it. In order to get network connectivity to the container, we need to add devices to the container’s network namespace from the host.
Traditionally, when we run containers as the root user, we will create a virtual adpater and attach it to the container’s network namespace as eth0. The virtual adapter then joins a bridge that is shared with the host’s physical network interface. The bridge will have its own subnet that is unique from the host’s physical network and the bridge will handle routing traffic from the internal subnet to the network.
This model uses all Kernel native networking primitives. This is great for efficiency and speed. However, none of these devices can be created by a non-root user.
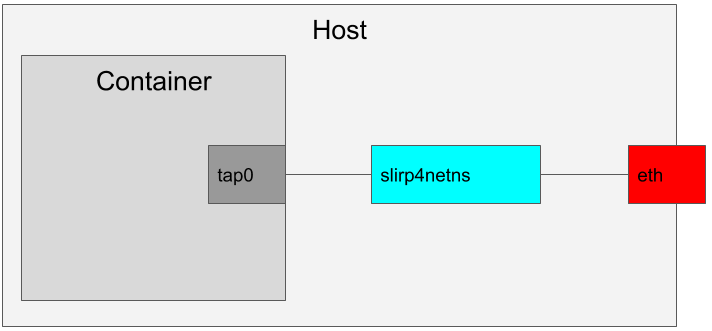
When we create a container as a non-root user, we have to do something slightly different. We use an application called slirp4netns. This application creates a tap inside the container’s network namespace and attaches to it. The application then handles traffic routing much the same way the bridge would, except in user space.
Exercise 7.3 - Before We Begin
Before we start to explore this, we need to enable the ability for a rootless container to ping through the physical network. Run the following command as root on the host.
sysctl -w "net.ipv4.ping_group_range=0 2000000"Exercise 7.4 - Create A Sandbox
Let’s create a sandbox and launch a Bash shell into that sandbox.
su - rhel   # if necessary
unshare -unUr /bin/bash
echo $$
7179
Nothing new in this step. Our new Bash shell is PID 7179. We will need this shortly.
Exercise 7.5 - Create a Tap in the Sandbox
From another shell that is not in the sandbox, we will start slirp4netns and allow it to create the tap device.
su - rhel  # if necessary
slirp4netns -c 7179 tap0
sent tapfd=5 for tap0 received tapfd=5
When we called slirp4netns -c indicated that we want to go ahead and configure the device in the namespace. The 7179 indicates that we want to work in the network namespace used by PID 7179. Finally tap0 indicates that our new device should be called tap0.
The slirp4netns command will not return control back to the prompt as it continues to run for the life of the container.
Switch back to the terminal that is in your sandbox environtment and check the network interfaces.
ip a1: lo: <LOOPBACK> mtu 65536 qdisc noop state DOWN group default qlen 1000
link/loopback 00:00:00:00:00:00 brd 00:00:00:00:00:00
2: tap0: <BROADCAST,UP,LOWER_UP> mtu 1500 qdisc fq_codel state UNKNOWN group default qlen 1000
link/ether 7a:27:4b:28:14:da brd ff:ff:ff:ff:ff:ff
inet 10.0.2.100/24 brd 10.0.2.255 scope global tap0
valid_lft forever preferred_lft forever
inet6 fe80::7827:4bff:fe28:14da/64 scope link
valid_lft forever preferred_lft forever
Look at that! It created and configured our tap0 netork adapter for us! That’s nice.
From here you can test out the network interface. For example, try pinging 8.8.8.8.
×
Workshop Details
| Domain |
|
|
| Workshop | ||
| Student ID |
Workshop Details
| Domain |
|
|
| Workshop | ||
| Student ID |