Exercise 1.4 - CGroups
Exercise Description
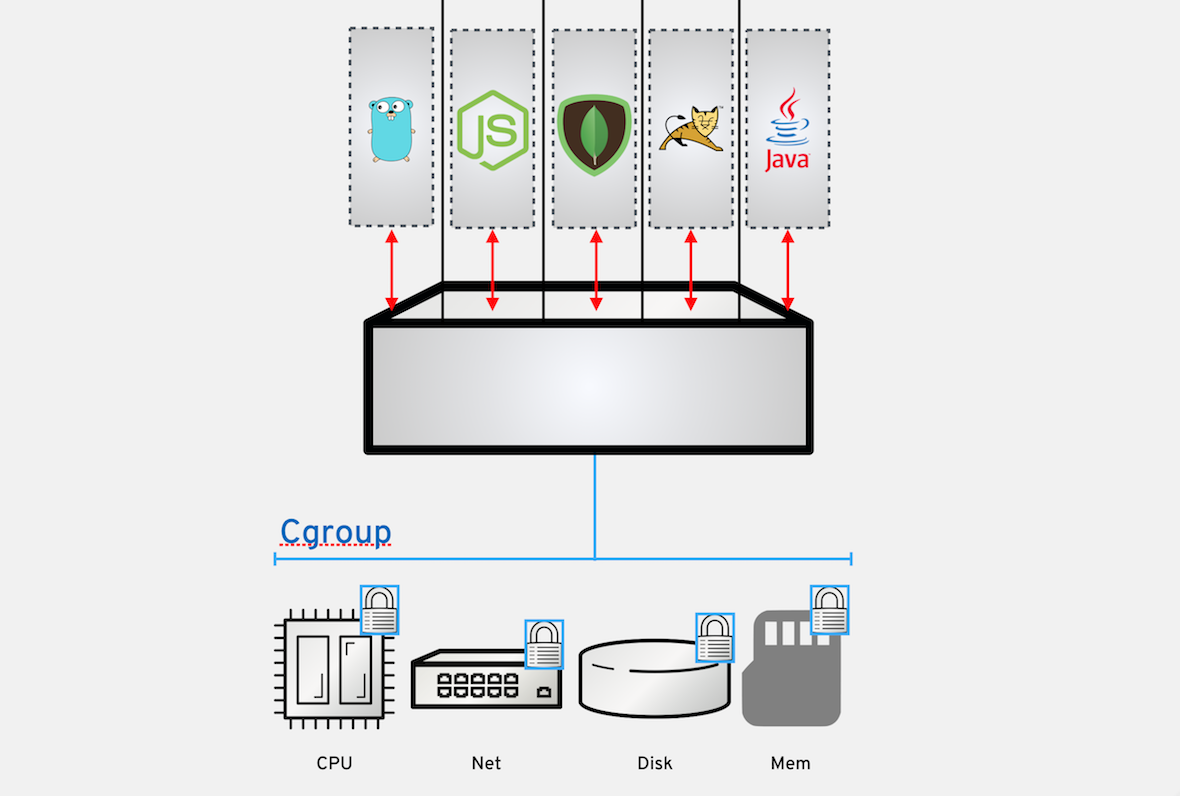
The Device Cgroup is primary in isolating and limiting containers to their own shares of CPU, memory, disk I/O, network, etc., otherwise the container will be denied. This exercise covers management of memory and CPU limitations.
Section 1: Memory Limits
Container technology uses Cgroups to control and limit the amount of system resources a container can use, and provide administrators with fine-grained control over allocating, prioritizing, denying, managing and monitoring system resources. Cgroups help protect a system from potential application memory leaks or Denial of Service (DoS) attacks that can consume all available memory and take down a system.
Step 1. Run containers with resource flags
By running containers with special resource flags, we can restrict the amount of memory a container is able to consume, even when an application is trying to consume more memory.
sudo podman run -d --name fedora1 fedora sleep 15mStep 2. Check for memory limits on a container
We can check using the podman stats command and see that this instance fedora1 has no memory limits placed on it.
sudo podman stats --no-stream fedora1ID NAME CPU % MEM USAGE / LIMIT MEM % NET IO BLOCK IO PIDS
c69226b2ff48 fedora1 -- 2.699MB / 1.925GB 0.14% 698B / 446B -- / -- 1Step 3. Place a memory limit on a container
Now we can place a memory limit on this second container fedora2 with the resource flag --memory.
sudo podman run -d --name fedora2 --memory 150m fedora sleep 15mStep 4. Check for the new memory restrictions on the container
Now, check again using the podman stats command, to see the memory restrictions placed on this new container.
sudo podman stats --no-stream fedora1 fedora2ID NAME CPU % MEM USAGE / LIMIT MEM % NET IO BLOCK IO PIDS
c69226b2ff48 fedora1 -- 2.699MB / 1.925GB 0.14% 698B / 984B -- / -- 1
d46d05f1924a fedora2 -- 73.73kB / 157.3MB 0.05% 628B / 446B -- / -- 1Now you know how to restrict the amount of memory a container is able to use.
Step 5. Clean Up
Lets clean up for the next exercise.
Kill all running containers
sudo podman kill $(sudo podman ps -q)Delete exited containers
sudo podman rm $(sudo podman ps -aqf status=exited)Make sure everything is cleared out.
sudo podman ps -aSection 2: CPU Limits
By default, each container’s access to the host machine’s CPU cycles is unlimited. Various constraints can be set to limit a given container’s access to the host machine’s CPU cycles. Docker provides several flags for setting limits on how many shares of a processor a container is able to use. Previously we looked at memory restrictions and setting a maximum ceiling for memory usage, CPU limits are set by shares.
In this exercise, we will define share weights for each container and split the available shares between the containers for a single processor.
Step 1. Lets run a container with 512 limit of CPU shares.
sudo podman run -d --name fedora1 --cpuset-cpus 0 --cpu-shares 512 dkuffner/docker-stress --cpu 10Step 2. Determine the container’s share usage
Now lets see how many shares this container is using.
sudo podman stats --no-stream fedora1ID NAME CPU % MEM USAGE / LIMIT MEM % NET IO BLOCK IO PIDS
1a41cc38b563 fedora1 2.10% 376.8kB / 1.925GB 0.02% 698B / 446B -- / -- 11CPU shares are defined as a value between 0-1024, however when idle the container will use all available shares until another process needs to use the existing shares. Let’s run a example where another container needs to run and we divide up the shares equally.
sudo podman run -d --name fedora2 --cpuset-cpus 0 --cpu-shares 512 dkuffner/docker-stress --cpu 10Step 3. View the processor shares
Now lets see how the processor shares get divided between the two.
sudo podman stats --no-stream fedora1 fedora2ID NAME CPU % MEM USAGE / LIMIT MEM % NET IO BLOCK IO PIDS
1a41cc38b563 fedora1 6.79% 376.8kB / 1.925GB 0.02% 698B / 914B -- / -- 11
083236dd4c8e fedora2 4.99% 372.7kB / 1.925GB 0.02% 558B / 446B -- / -- 11Now you know how to control the amount of CPU shares a container is able to use.
Step 4. Clean Up
Lets clean up for the next exercise.
Kill all running containers
sudo podman kill $(sudo podman ps -q)Delete exited containers
sudo podman rm $(sudo podman ps -aqf status=exited)Make sure everything is cleared out.
sudo podman ps -a
×
Workshop Details
| Domain |
|
|
| Workshop | ||
| Student ID |
Workshop Details
| Domain |
|
|
| Workshop | ||
| Student ID |