Deploying an App into the Service Mesh
It’s time to deploy your microservices application. The application you are working on is a paste board application in which users can post comments in shared boards. Here is a diagram of the architecture:
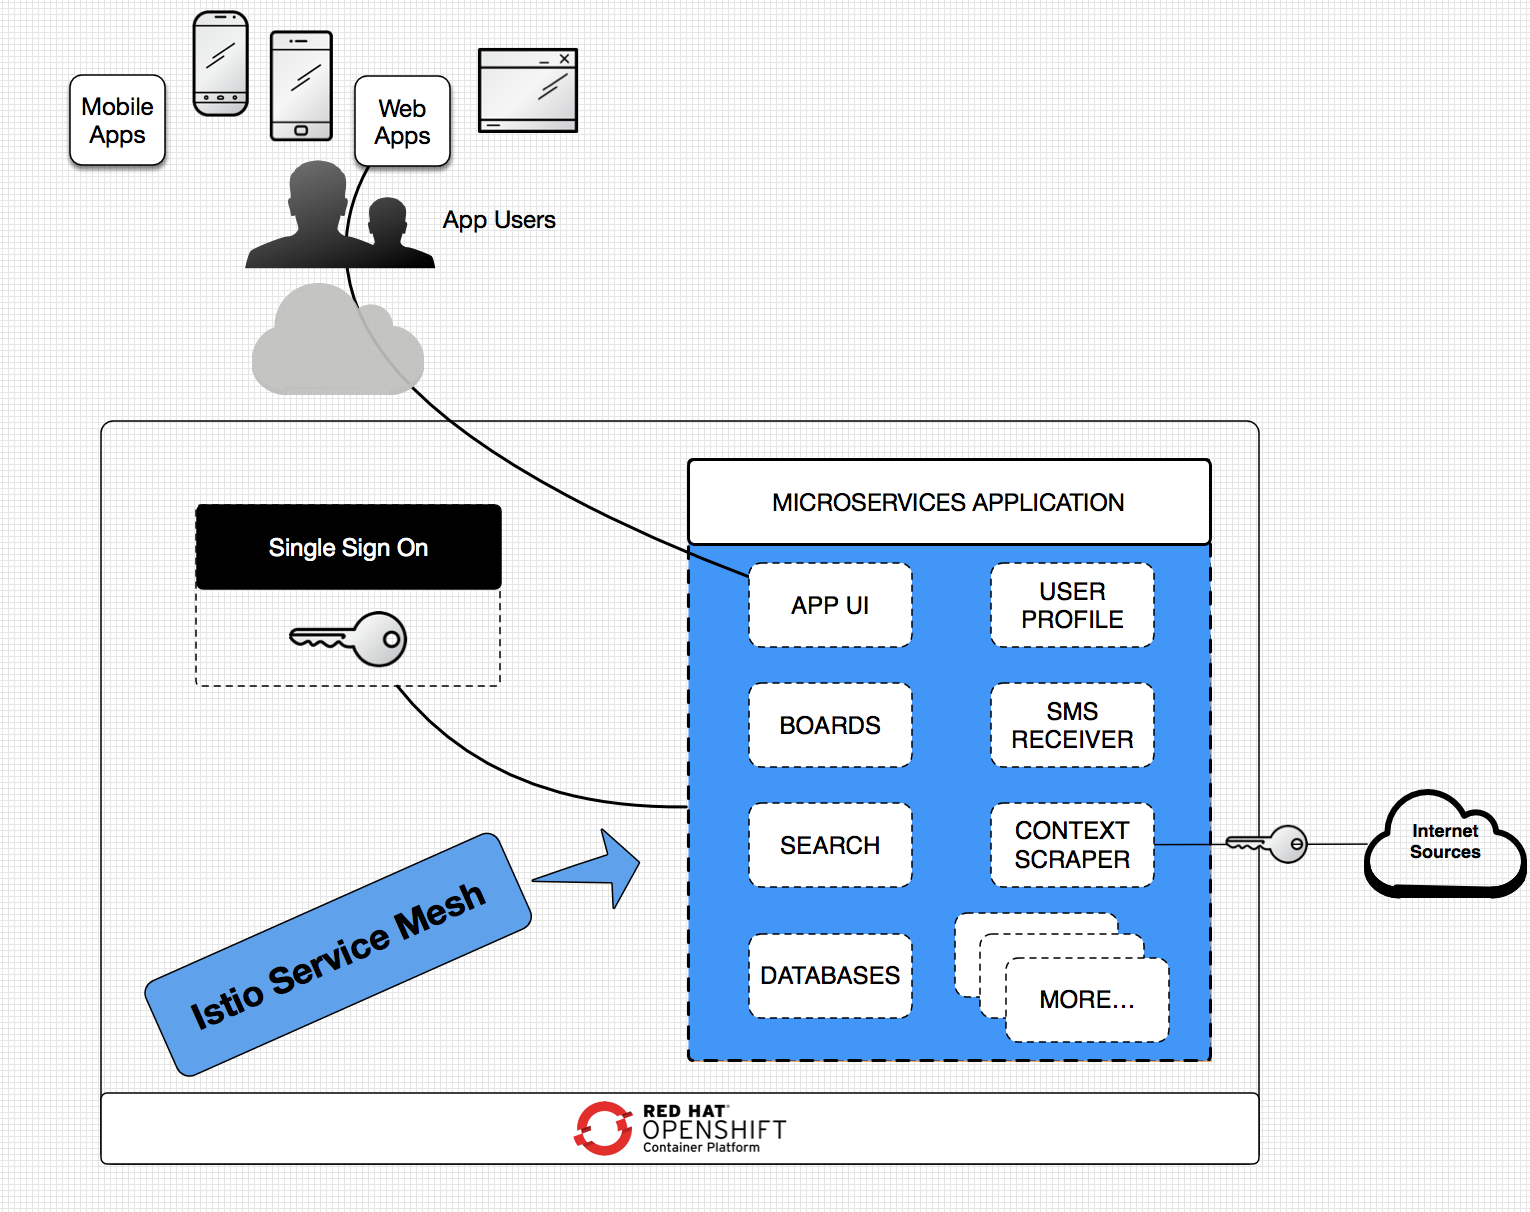
App Architecture
The microservices include single sign-on (SSO), user interface (UI), the boards application, and the context scraper. In this scenario, you are going to deploy these services and then add a new user profile service.
Deploy Microservices
You are going to build the application images from source code and then deploy the resources in the cluster.
The source files are labeled ‘{microservice}-fromsource.yaml’. In each file, an annotation ‘sidecar.istio.io/inject’ was added to tell Istio to inject a sidecar proxy.
Verify the annotation in the 'app-ui' file:
cat openshift-configuration/app-ui-fromsource.yaml | grep -B 1 sidecar.istio.io/inject
Output:
	annotations:
	  sidecar.istio.io/inject: "true"
Now let’s deploy the microservices.
Deploy the boards service:
oc new-app -f ./openshift-configuration/boards-fromsource.yaml \
  -p APPLICATION_NAME=boards \
  -p NODEJS_VERSION_TAG=10 \
  -p GIT_URI=https://github.com/RedHatGov/openshift-microservices.git \
  -p GIT_BRANCH=workshop-stable \
  -p DATABASE_SERVICE_NAME=boards-mongodb \
  -p MONGODB_DATABASE=boardsDevelopment
Deploy the context scraper service:
oc new-app -f ./openshift-configuration/context-scraper-fromsource.yaml \
  -p APPLICATION_NAME=context-scraper \
  -p NODEJS_VERSION_TAG=10 \
  -p GIT_BRANCH=workshop-stable \
  -p GIT_URI=https://github.com/RedHatGov/openshift-microservices.git
Deploy the user interface:
oc new-app -f ./openshift-configuration/app-ui-fromsource.yaml \
  -p APPLICATION_NAME=app-ui \
  -p NODEJS_VERSION_TAG=10 \
  -p GIT_BRANCH=workshop-stable \
  -p GIT_URI=https://github.com/RedHatGov/openshift-microservices.git \
  -e FAKE_USER=true
Watch the microservices demo installation:
oc get pods --watch
Wait a couple minutes. You should see the ‘app-ui’, ‘boards’, ‘context-scraper’, and ‘sso’ pods running. For example:
NAME                       READY   STATUS      RESTARTS   AGE
app-ui-1-build             0/1     Completed   0          64m
app-ui-1-xxxxx             2/2     Running     0          62m
app-ui-1-deploy            0/1     Completed   0          62m
boards-1-xxxxx             2/2     Running     0          62m
boards-1-build             0/1     Completed   0          64m
boards-1-deploy            0/1     Completed   0          62m
boards-mongodb-1-xxxxx     2/2     Running     0          64m
boards-mongodb-1-deploy    0/1     Completed   0          64m
context-scraper-1-build    0/1     Completed   0          64m
context-scraper-1-xxxxx    2/2     Running     0          62m
context-scraper-1-deploy   0/1     Completed   0          62m
Each microservices pod runs two containers: the application itself and the Istio proxy.
Print the containers in the 'app-ui' pod:
oc get pods -l app=app-ui -o jsonpath='{.items[*].spec.containers[*].name}{"\n"}'
Output:
app-ui istio-proxy
Access Application
The application is deployed! But you need a way to access the application via the user interface.
Istio provides a Gateway resource, which can configure a load balancer at the edge of the service mesh. In the previous lab, you verified that a load balancer was already created for you in your project. The next step is to deploy a Gateway resource and configure the load balancer to route to the application user interface.
Create the gateway configuration and routing rules:
oc process -f ./istio-configuration/ingress-gateway.yaml \
  -p INGRESS_GATEWAY_NAME=demogateway-$PROJECT_NAME | oc create -f -
To access the application, you need the endpoint of your load balancer.
Retrieve the URL of the load balancer:
GATEWAY_URL=$(oc get route istio-demogateway-$(oc project -q) --template='http://{{.spec.host}}')
echo $GATEWAY_URL
Navigate to this URL in the browser:
http://istio-demogateway-userX-userX.apps.example.redhatgov.io:6443
You should see the application user interface. Try creating a new board and posting to the shared board.
For example:
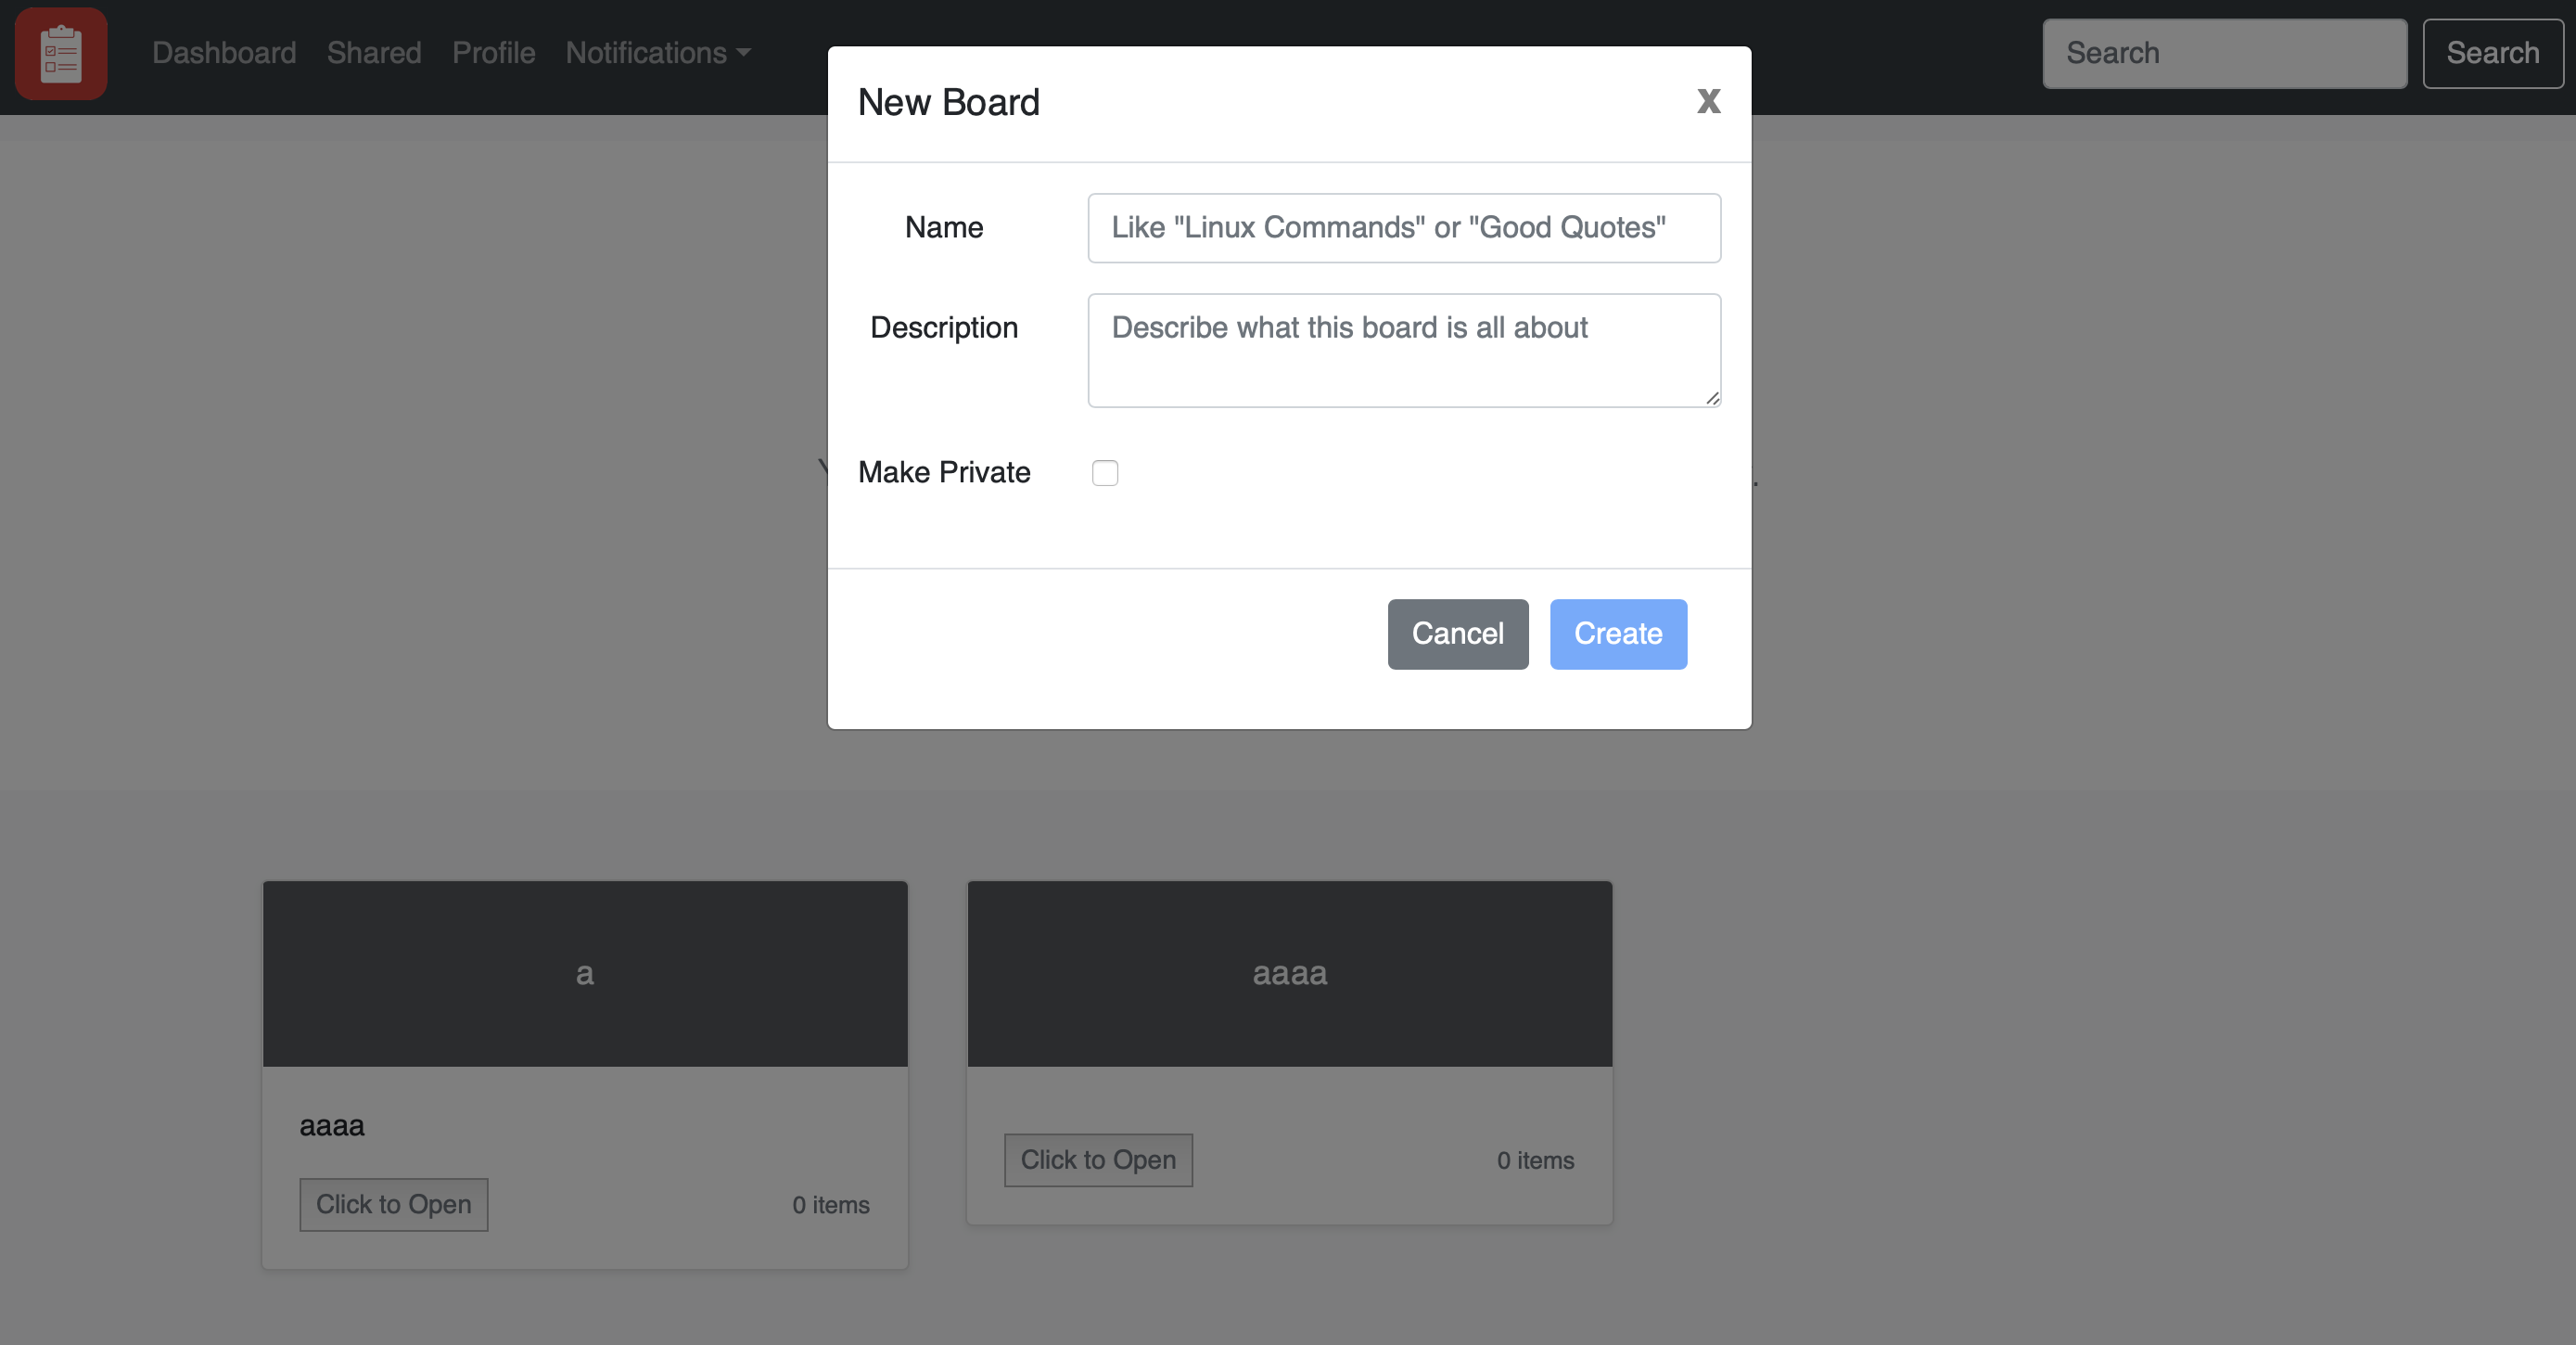
Create a new board
Summary
Congratulations, you installed the microservices application!
A few key highlights are:
- The demo microservices application is a paste board application
- The annotation ‘sidecar.istio.io/inject’ tells Istio to inject a sidecar proxy into the microservice pod
- A Gateway resource configures an edge load balancer to allow inbound connections into the service mesh
Workshop Details
| Domain |
|
|
| Workshop | ||
| Student ID |
Workshop Details
| Domain |
|
|
| Workshop | ||
| Student ID |