Security Groups in OpenStack
A security group is a named collection of network access rules that are used to limit the types of traffic that have access to instances. When you launch an instance, you can assign one or more security groups to it. If you do not create security groups, new instances are automatically assigned to the default security group, unless you explicitly specify a different security group.
The associated rules in each security group control the traffic to instances in the group. Any incoming traffic that is not matched by a rule is denied access by default. You can add rules to or remove rules from a security group, and you can modify rules for the default and any other security group.
You can modify the rules in a security group to allow access to instances through different ports and protocols. For example, you can modify rules to allow access to instances through SSH, to ping instances, or to allow UDP traffic.
You specify the following parameters for rules:
Source of traffic - Enable traffic to instances from either IP addresses inside the cloud from other group members or from all IP addresses.
Protocol - Choose TCP for SSH, ICMP for pings, or UDP.
Destination port on virtual machine - Define a port range. To open a single port only, enter the same value twice. ICMP does not support ports; instead, you enter values to define the codes and types of ICMP traffic to be allowed.
Rules - automatically enforced as soon as you create or modify them.
You cannot delete the default security group for a project. Also, you cannot delete a security group that is assigned to a running instance.
Let’s Look at the Default Security Group
Navigate to Network -> Security Groups using the second level navigation tabs
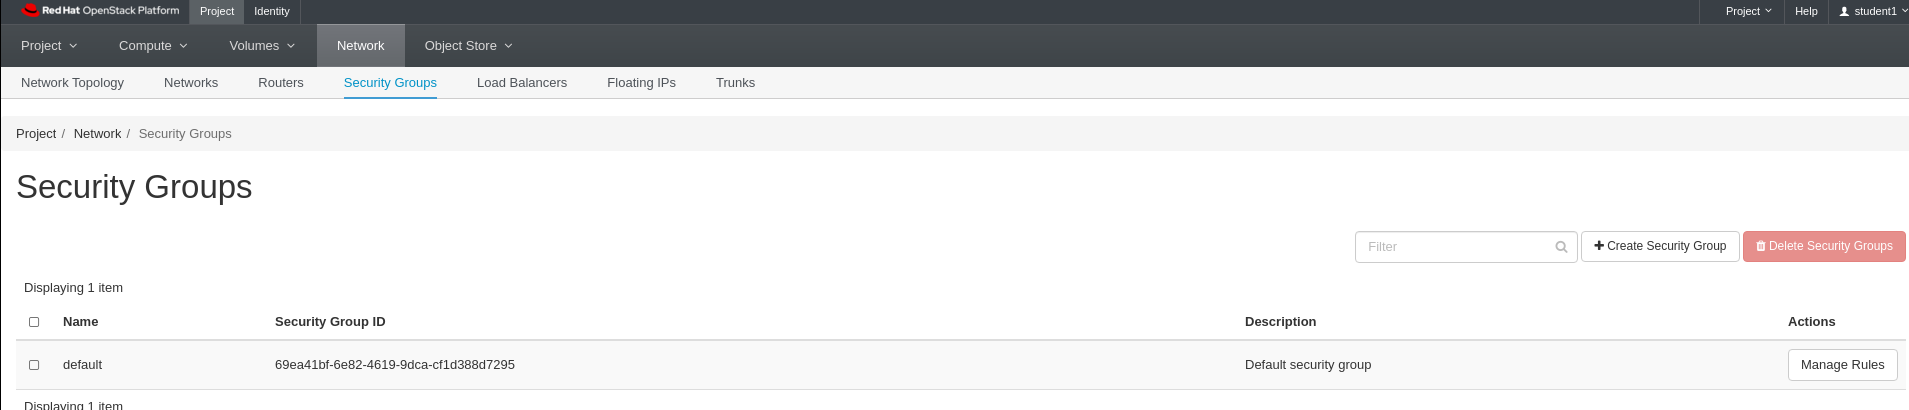
Lab 4 Figure 1: Security Group Listing
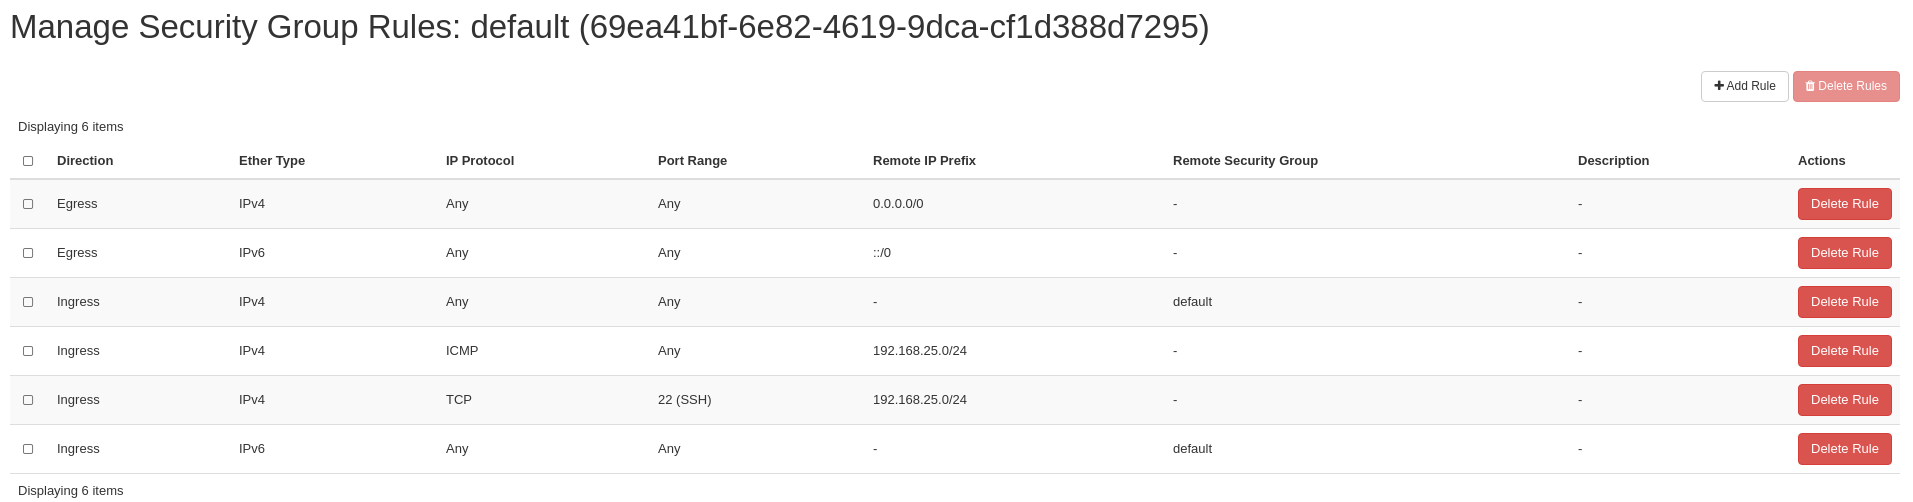
Click Manage Rules on the right hand side of the row for default security group
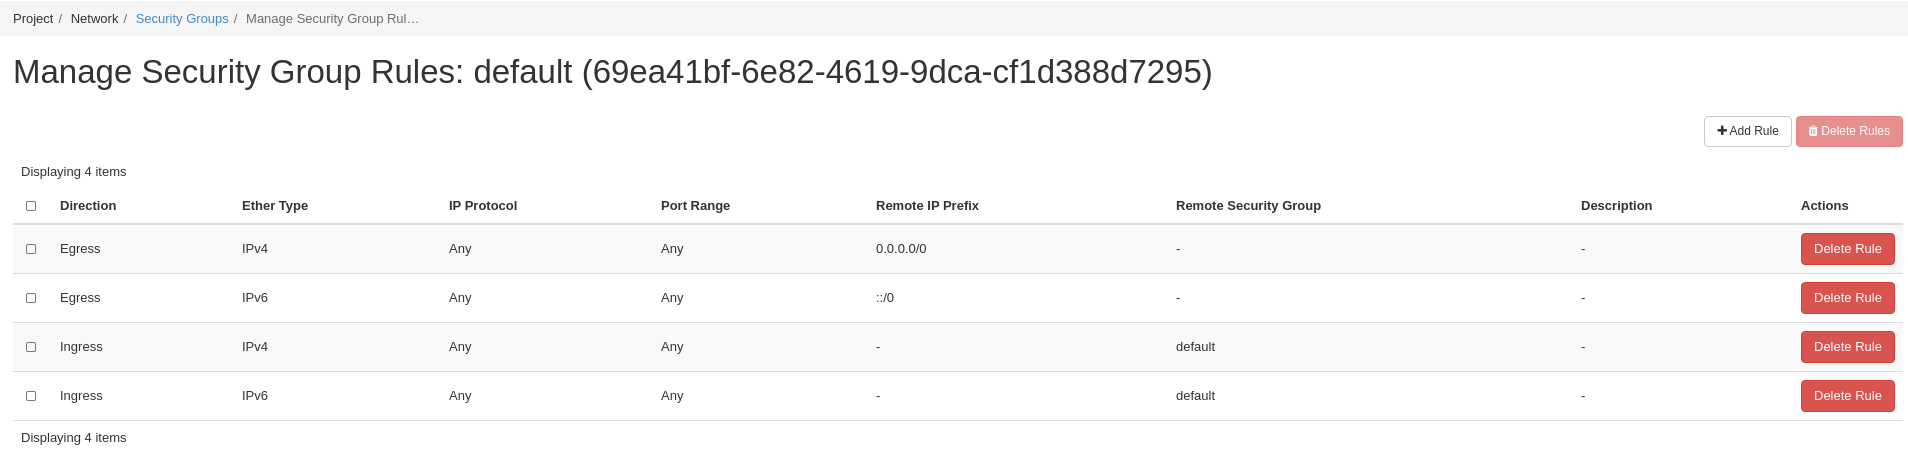
Lab 4 Figure 2: Viewing Rules for default Security Group
Now Let’s Add Two Rules to the default Security Group for ICMP and SSH
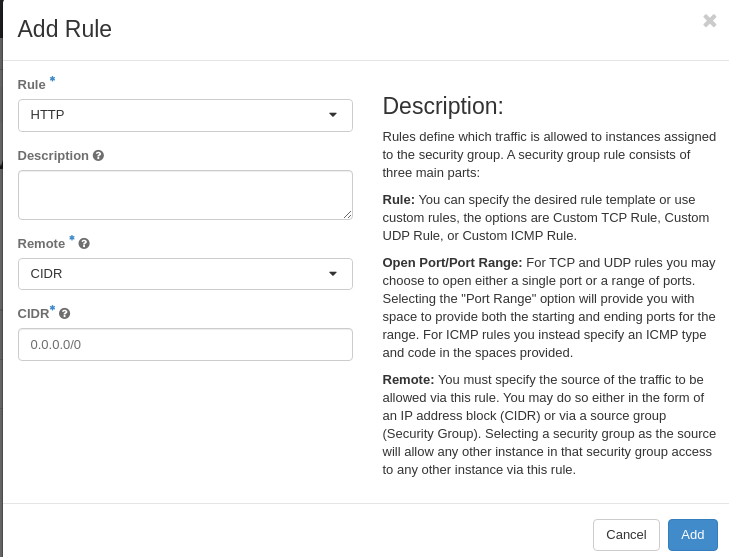
On the Manage Rules screen for default security group, click Add Rule
Select All ICMP for Rule
Leave Direction set to Ingress
Leave Remote set to CIDR Enter 192.168.0.0/23 for CIDR (this is our external network)
Click Add
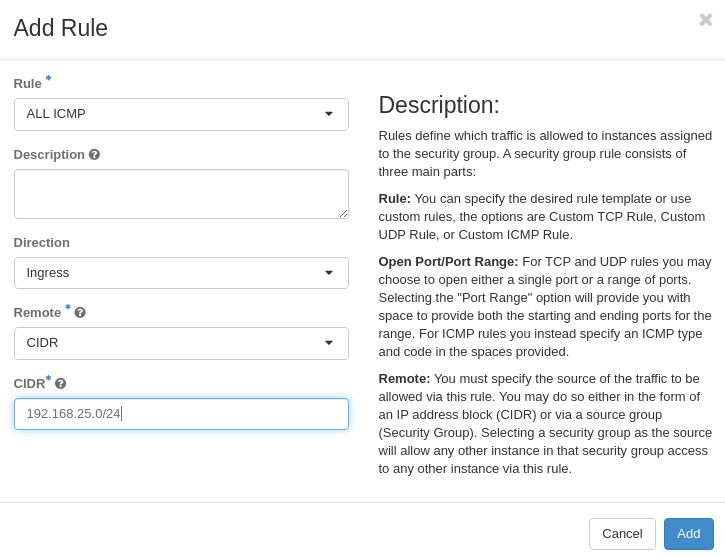
Lab 4 Figure 3: Add ICMP Rule to default Security Group
You should see a green box appear in the upper right corner of the screen that says “Success: Successfully added rule: ALLOW IPv4 icmp from 192.168.0.0/23”
If you did not see a success message, let the intstructor know now
On the Manage Rules screen for default security group, click Add Rule
Select SSH for Rule
Leave Remote set to CIDR Enter 192.168.0.0/23 for CIDR (this is our external network)
Click Add
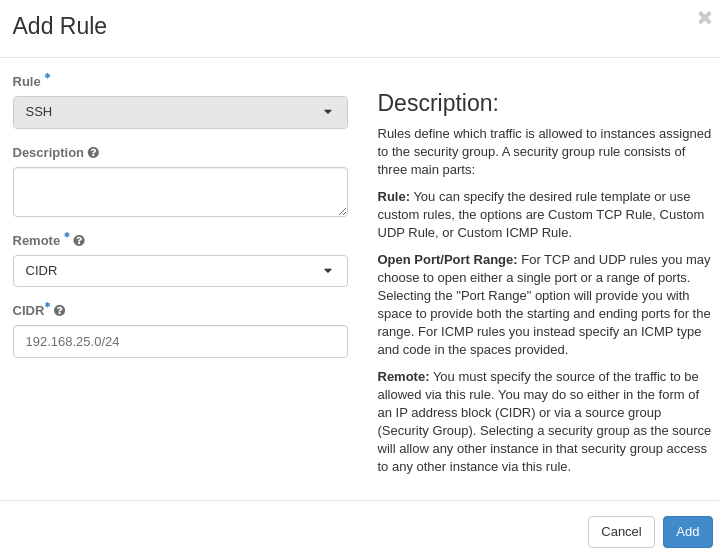
Lab 4 Figure 4: Add SSH Rule to default Security Group
You should see a green box appear in the upper right corner of the screen that says “Success: Successfully added rule: ALLOW IPv4 22/tcp from 192.168.0.0/23”
If you did not see a success message, let the intstructor know now
If we now look at the Manage Rules screen for the default security group, we will see our two new rules for ICMP and SSH ingress traffic allowed only from 192.168.0.0/23 CIDR.
Lab 4 Figure 5: Manage Rules Screen Showing Two New Rules for ICMP and SSH in the default Security Group
Now We will Create a New Security Group for Web Servers
Navigate to Network -> Security Groups using the second level navigation tabs
Lab 4 Figure 1: Security Group Listing
Click Create Security Group next to the filter search box
Enter web-server for the Name
Description is optional, but as you can see below, I used it to describe the purpose of this security group
Click Create Security Group
Lab 4 Figure 6: Create a New Security Group
You should see a green box appear in the upper right corner of the screen that says “Success: Successfully created security group: web-server”
If you did not see a success message, let the intstructor know now

Lab 4 Figure 7: Security Group Listing Showing New web-server Group
Now Let’s Add Two Rules to the web-server Security Group for HTTP and HTTPS
Click Manage Rules in the row for the web-server security group
click Add Rule
Select HTTP for Rule
Leave Remote set to CIDR Leave 0.0.0.0/0 for CIDR
Click Add
Lab 4 Figure 8: Add HTTP Rule to web-server Security Group
You should see a green box appear in the upper right corner of the screen that says “Success: Successfully added rule: ALLOW IPv4 80/tcp from 0.0.0.0/0”
If you did not see a success message, let the intstructor know now
On the Manage Rules screen for web-server security group, click Add Rule
Select HTTPS for Rule
Leave Remote set to CIDR Enter 0.0.0.0/0 for CIDR
Click Add
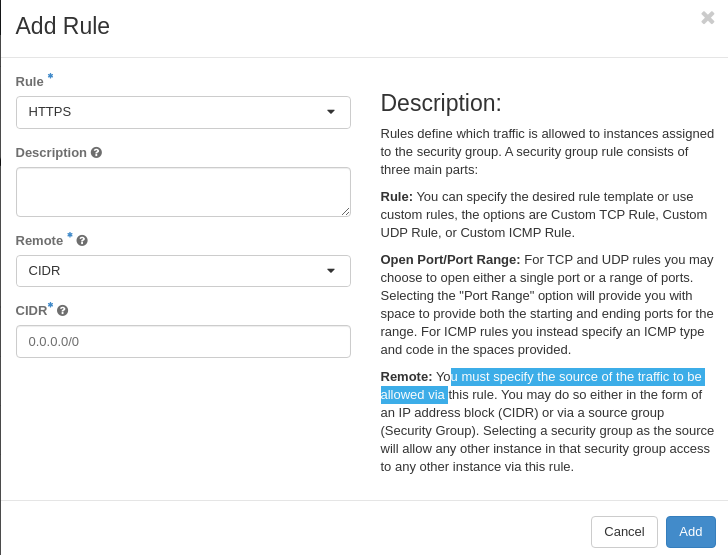
Lab 4 Figure 9: Add HTTPS Rule to web-server Security Group
You should see a green box appear in the upper right corner of the screen that says “Success: Successfully added rule: ALLOW IPv4 443/tcp from 0.0.0.0/0”
If you did not see a success message, let the intstructor know now
If we now look at the Manage Rules screen for the web-server security group, we will see our two new rules for HTTP and HTTPS ingress traffic allowed from all sources.
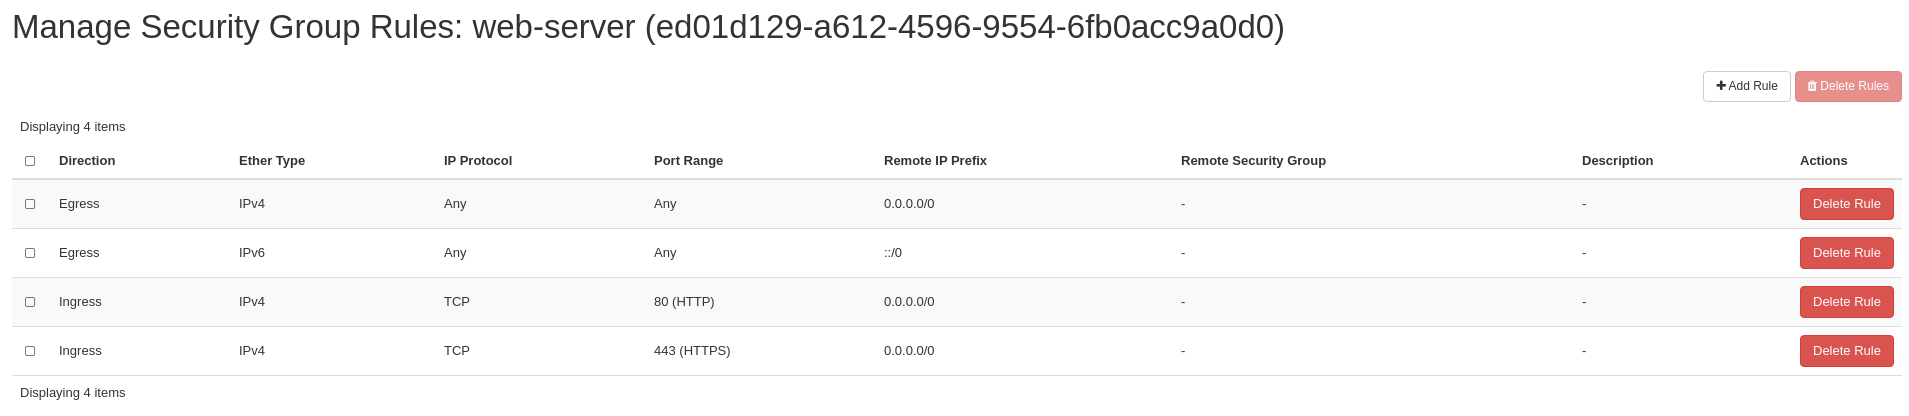
Lab 4 Figure 10: Manage Rules Screen Showing Two New Rules for HTTP and HTTPS in the web-server Security Group
Summary
We have now learned how to create and modify security groups in our project. We can utilize these to build up firewall sets for our resources.
Note that security groups can be combined together on instances to build up a set of rules depening on the instance role in your applications.
In our next lab, we will start working with images.
Workshop Details
| Domain |
|
|
| Student ID | ||