What is a container?
It is a simple question without a simple answer. Search the internet for this question and you’ll find an endless stream of blog posts explaining how containers differ from virtual machines. That’s great, but that doesn’t answer my question. What is a container? Does anybody really understand what is happening on their server what they podman run?
By the end of this workshop, you will feel confident answering this question and explaining it to your peers.
So really… What is it?
A container is a sandboxed runtime environment that exists on a Linux system. The sandbox is constructed using utilities that exist in the Linux Kernel. Applications running in this sandbox share a Kernel with their host, but certain parts of the Kernel that store machine state are abstracted through namespaces. Namespaces allow the isolated environment to have a different state than the host even though they are sharing a Kernel.
The contents of the filesystem are typically provided by an image file and the environment exists as a chroot process in the filesystem.
The network stack inside the container is constructed with the Linux network stack primitives to share a connection with the host without worrying about conflicting port numbers.
Ideally, the software that is run in this sandbox should not recognize it is in a sandbox. The software should run just as it would run natively on a host. A container should not change how the software interfaces with the system.
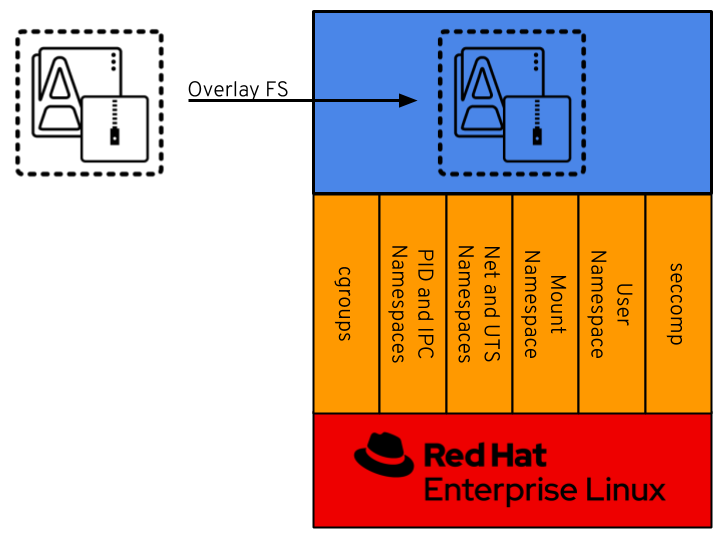
In Figure 2 above, the sandboxed container environment can be seen as the blue box. The orange boxes are the Kernel Namespaces and they are as follows:
cgroups
cgroups allow limits to be placed on a process and its children. Primarily, these are used for limiting CPU and RAM usage. We won’t dive deep into cgroups as they are technically optional for containers. However, you will be using them in production.
PID and IPC Namespaces
The PID namespace allows a process and its children to run in a new process tree that maps back to the host process tree. The new PID namespace starts with PID 1 which will map to a much higher PID in the host’s native PID namespace. The Inter-Process Communication (IPC) Namespace limits the processes ability to share memory.
Network and UTS Namespaces
The Network Namespace allows a new network stack to exist in the sandbox. This means our sandboxed environment can have its own network interfaces, routing tables, DNS lookup servers, IP addresses, subnets… you name it! The Unix Time Sharing (UTS) Namespace exists solely for storing the system’s hostname. Seriously. A whole namespace to store one string. This namespace has a long history and has changed quite a bit along the way. It exists the way it is for historical reasons.
Mount Namespace
The Mount Namespace is the part of the Kernel that stores the mount table. When our sandboxed environment runs in a new Mount Namespace, it can mount filesystems not present on the host. This is very important, as you’ll see.
User Namespace
The User Namespaces allow our sandboxed environment to have its own set of user and group IDs that will map to very high, unique, user and group IDs back on the host system. They also allow the root user in the sandbox to be mapped to another user on the host.
seccomp
The seccomp utility, while not actually a namespace, acts as a filter for Kernel calls. This allows us to drop Kernel capabilities in our sandboxed environment. For example, we could drop the CAP_NET_RAW kernel capability and processes in our sandbox will not be able to ping. Utilizing seccomp is also not strictly vital to containers and will not be discussed in further detail in this workshop.
Next, in Figure 2, we see that an application and its dependencies come from an image file. The contents of this image file are duplicated into our sandbox as the root filesystem using OverlayFS and chroot. Technically speaking, there are many strategies for mounting the root filesystem in the container, but OverlayFS is quite common and is what we will explore in this workshop.
Setup for Containers the Hard Way
To work through this workshop, you will need access to a RHEL 8 machine. Don’t worry, though, we have one prepared for you.
Note: Your instructor may have different directions for connecting the workshop environment.
In this lab, we will use the RHEL 8 Lab Environments on: [lab.redhat.com][1]. This site has a handful of great RHEL 8 scenarios. We won’t be running through and of them today, but check them out sometime.
Navigate to the RHEL 8 labs, and start the Deploying Containers Using Podman scenario by clicked Start Scenario and then Start Scenario again.
This will open a screen with lab instructions on the left and terminals on the right. You can minimize the provided directions, we won’t be using them today. On the right, note that you have access to two terminals. You can open another tab with the + button.
Conventions Used in this Workshop
When something written is a command that you should type, it is separated in a code block, like this:
echo "hello, world!"And the output will be shown in a block, like this:
hello, world!
End Result
At this point, you should have logged into your node. If you haven’t, let us know so we can help.
×
Workshop Details
| Domain |
|
|
| Workshop | ||
| Student ID |
Workshop Details
| Domain |
|
|
| Workshop | ||
| Student ID |